Map Design: The Print layout#
The print layout in QGIS is where you design and finalise the map in order to print or export it as a PDF (or file format of your choice). Here you can add important elements such as the legend, title, explanatory text, and anything you need to create a comprehensive map. By adding layout elements (legend, title, scale bar, sources, etc.) to a map, you provide your audience with the necessary information to contextualise and evaluate the information shown on the map.
Go to Project > New Print Layout > enter a name for the new print layout > click OK
A new window with a blank print layout will appear.
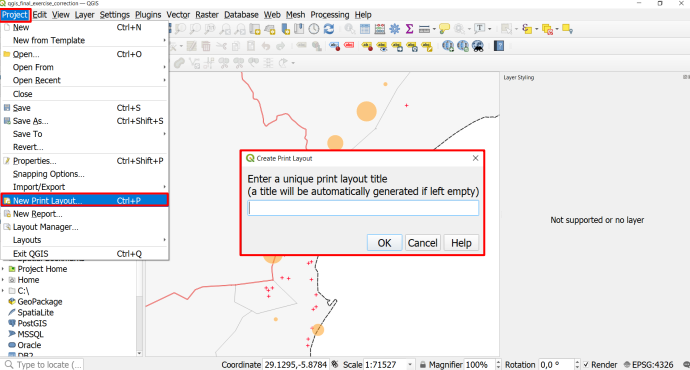
Fig. 116 Create a new Print Layout#
Map Composition#
A good map guides the reader in understanding the information available on the map, makes the information easily accessible, and is not overloaded with information.
In general, there are a few things to keep in mind when creating a map:
The main map should cover the largest portion of the page and be centred.
A complete map must have a legend, sources, title, scale, and necessary other information to contextualize the information presented on the map.
Additional information, such as title, sources, scale bar, legend, orientation, etc. should be scaled accordingly.
Titles should be large so the reader can identify it as the main topic of the map.
Additional information should be smaller and moved out of the main focus of the page (e.g. at the bottom, to the sides, or in the corners).
A well-structure page layout helps the reader discern the different information on the map and makes it easier to know where to look for certain information. Frames and boxes can structure the page layout. For example, a legend can be put on the bottom or to the right of the map.
Understanding the Print Layout Composer#
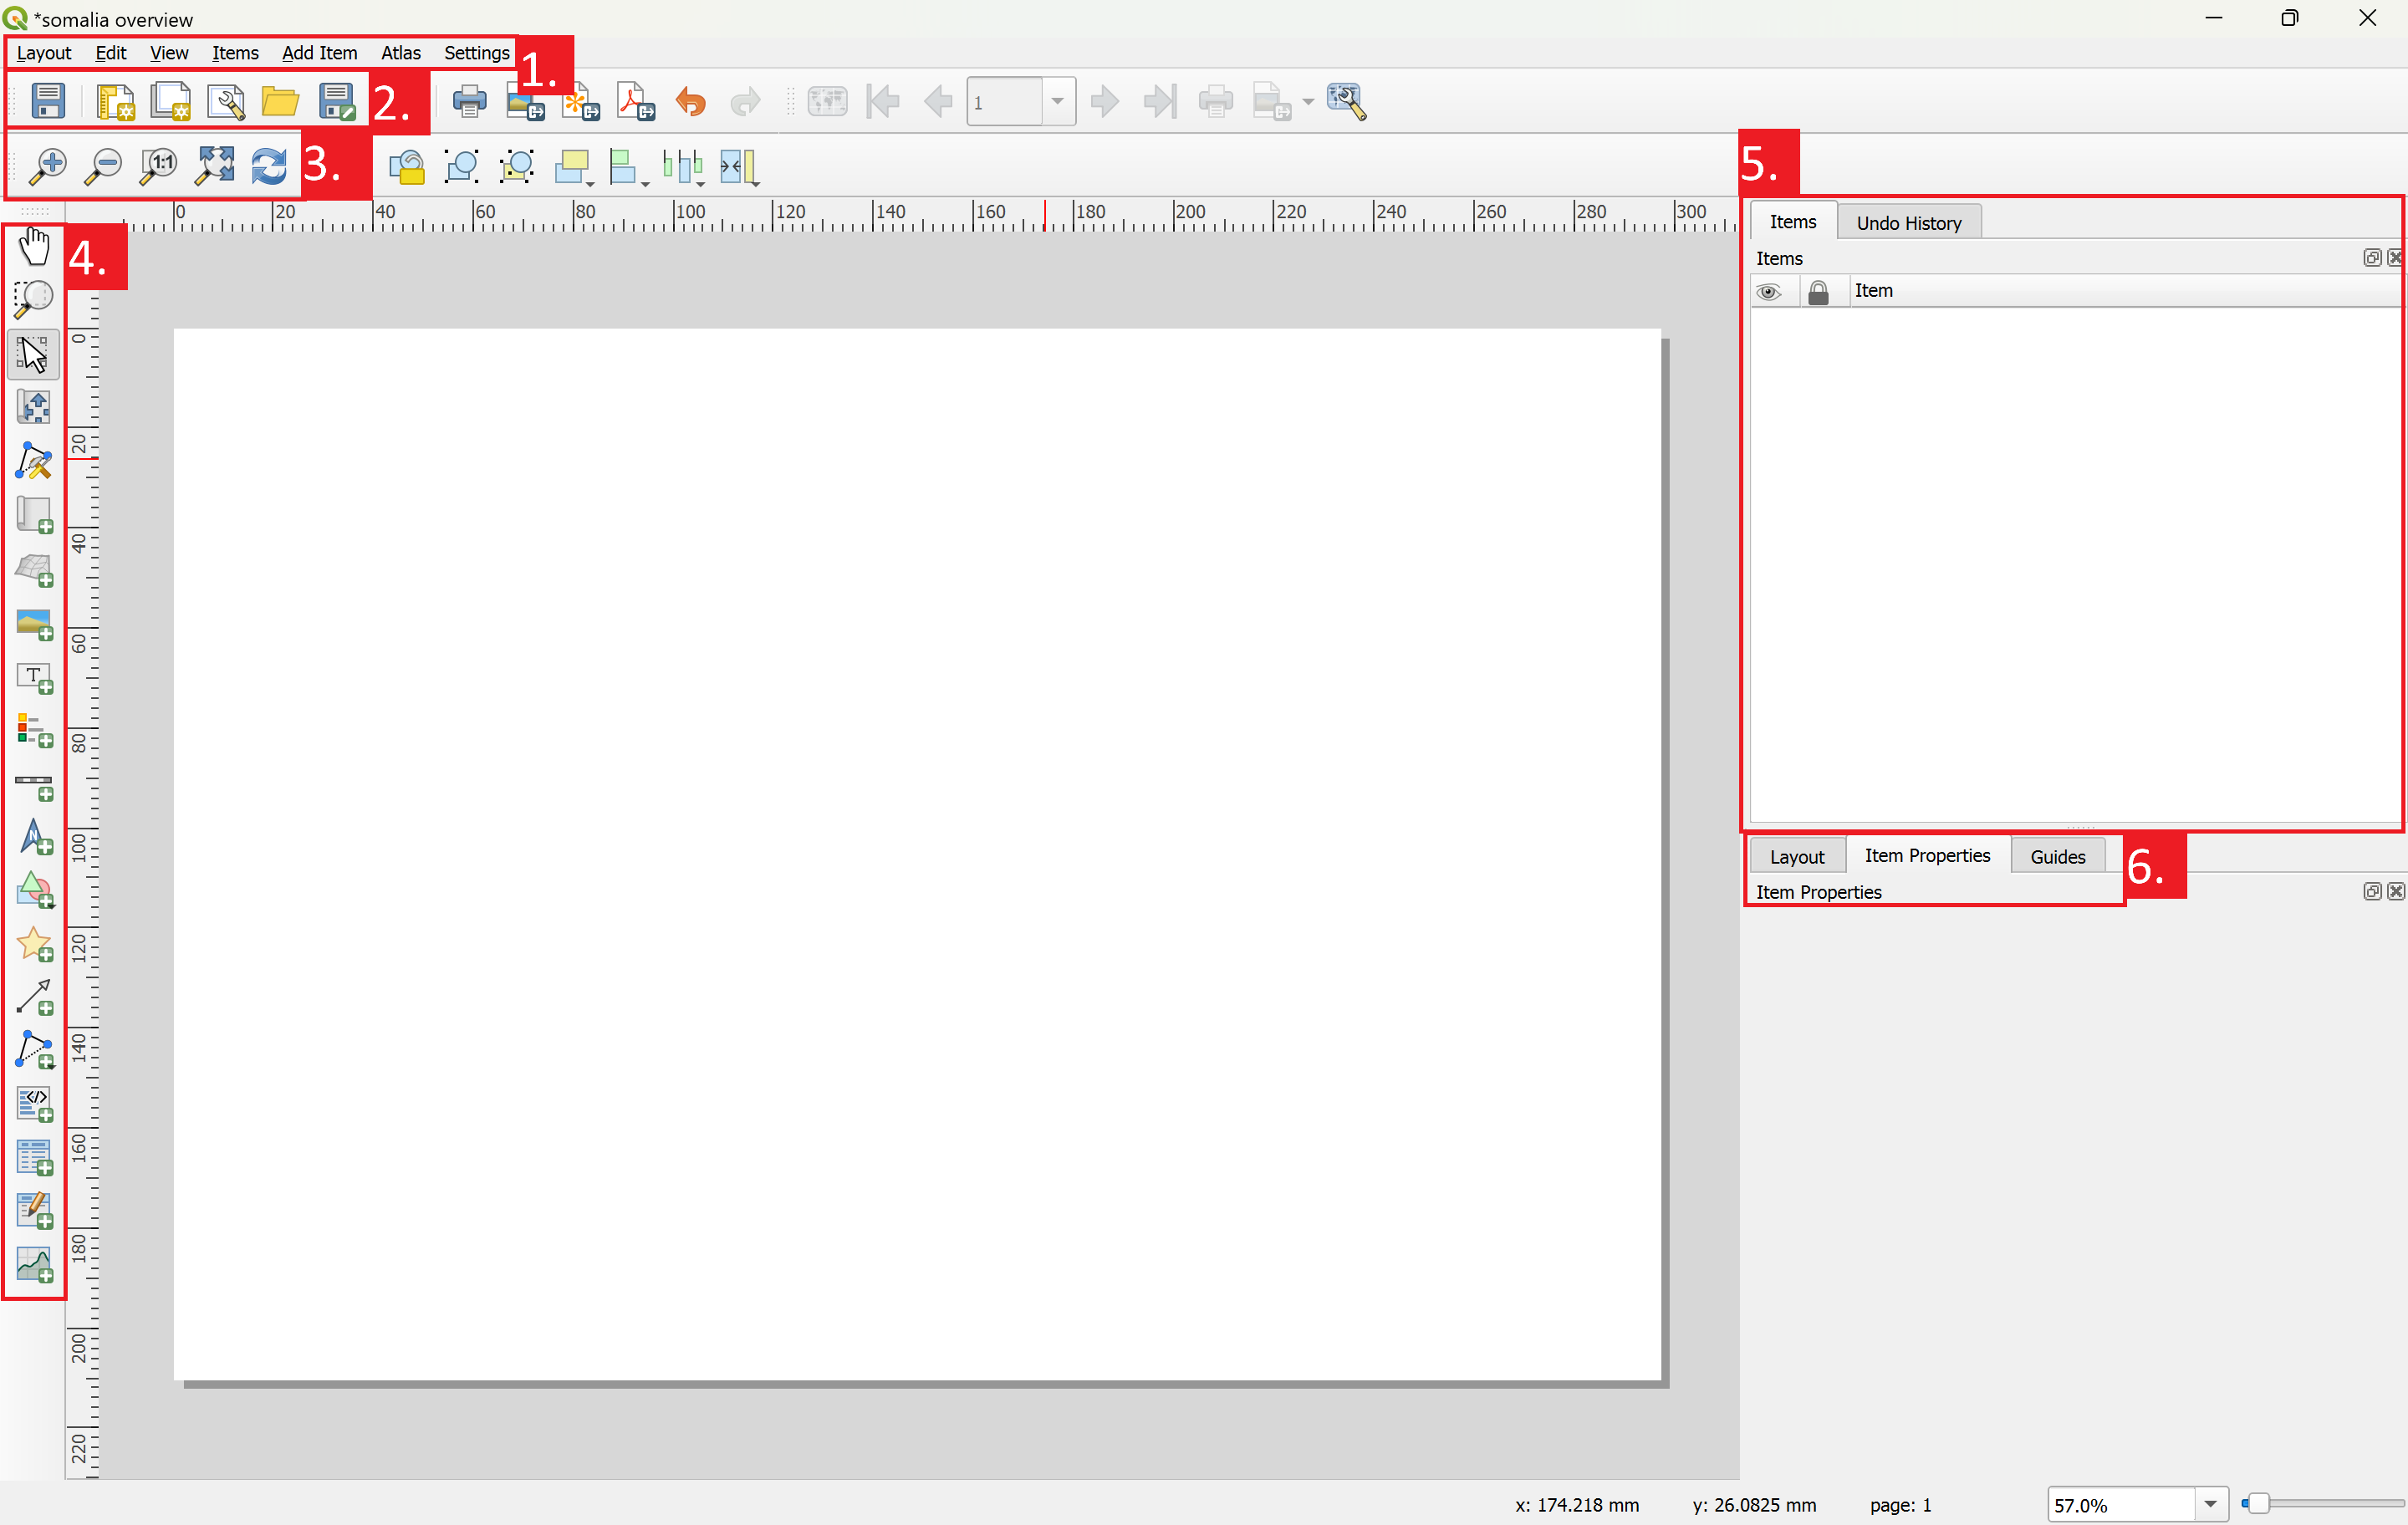
Fig. 117 The interface of the Print Layout Composer#
Layout Settings (Add pages, Export Map, manage panels)
Dialer Tools (Save, New, Duplicate, Add items from template, Save template)
Navigation bar (Zoom, Refresh, Lock/Unlock elements)
Toolbar (Zoom, Select, Move in Map, Add new map/image/text/legend/scale/shape/…)
Feature Panel: Displays the elements added to the print layout
Advanced Options: Customise each element of the layer
The print layout manager also works with toolbars (on the left side of the screen), where you can select different tools (e.g. to add images) and panels (on the right side of the screen), where you can change the settings of the tools or the elements you have added to the map.
First of all, you should always set the size of your map:
Right-click on the blank map >
Page PropertiesChoose the size of your document (A4, A3, A2). A4 and A3 are the most commonly used sizes for maps.
Choose the orientation (Landscape or Portrait).
Adding Elements to the Print Layout#
Adding a new map#
Add a new map by clicking on the

Add map-button on the toolbar on the left and drag a rectangle on the map canvas.To move the map on the canvas, simply select the map and drag it with your mouse
To move within a map select

Move item content-button on the left toolbar.To zoom in on the map, while using the
Move item contenttool, you can Press CTRL + scroll the mouse wheel (gently) or enter the scale manually in the item properties.
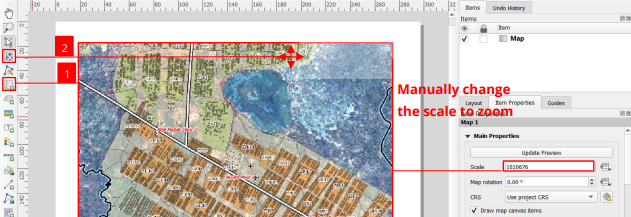
Fig. 118 Adding a new map to the Print Layout#
Adding a title or a text box#
A title should describe the phenomenon represented on the map.
To add text (title, explanations), use the

Add Label-tool and draw a rectangle of the desired size.In the Item Properties panel (on the right of your screen) you can enter your text and change the font, style, colour, etc. (_Remember to use the scroll bar in the window to see all the options).
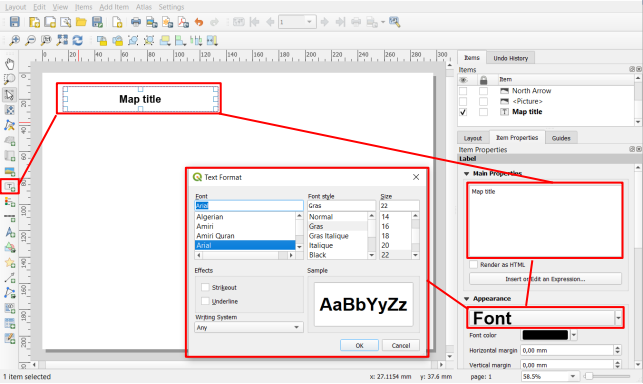
Fig. 119 Adding text to the print layout#
Video: Adding a textbox
Adding an image or logo#
If you are working for an organisation, most likely you will add the logo of that organization on the maps you produce.
Click on the

Add imagetool in the left toolbar.Drag a rectangle on the canvas.
In the Item Properties tab, you will have the option to choose an SVG image from your SVG-library in QGIS or choose a Raster image. Most image files are raster images.
Select
Raster imageand click on the...to choose the location of the image.Your image will appear in the print layout. In order to make sure that the image does not get distorted, leave the
Resize Modeon “Zoom”.
Video: Adding an image to the print layout
Adding a legend#
Before adding a legend, make sure that:
All your layers have an explicit name (“rivers”, “primary roads”,…)
You use the final version of your map (no more layers to add, move, rename or modify). You can still modify them later but you will have to redo the legend.
To add a legend, you can use the 
Add legend-button on the left toolbar.
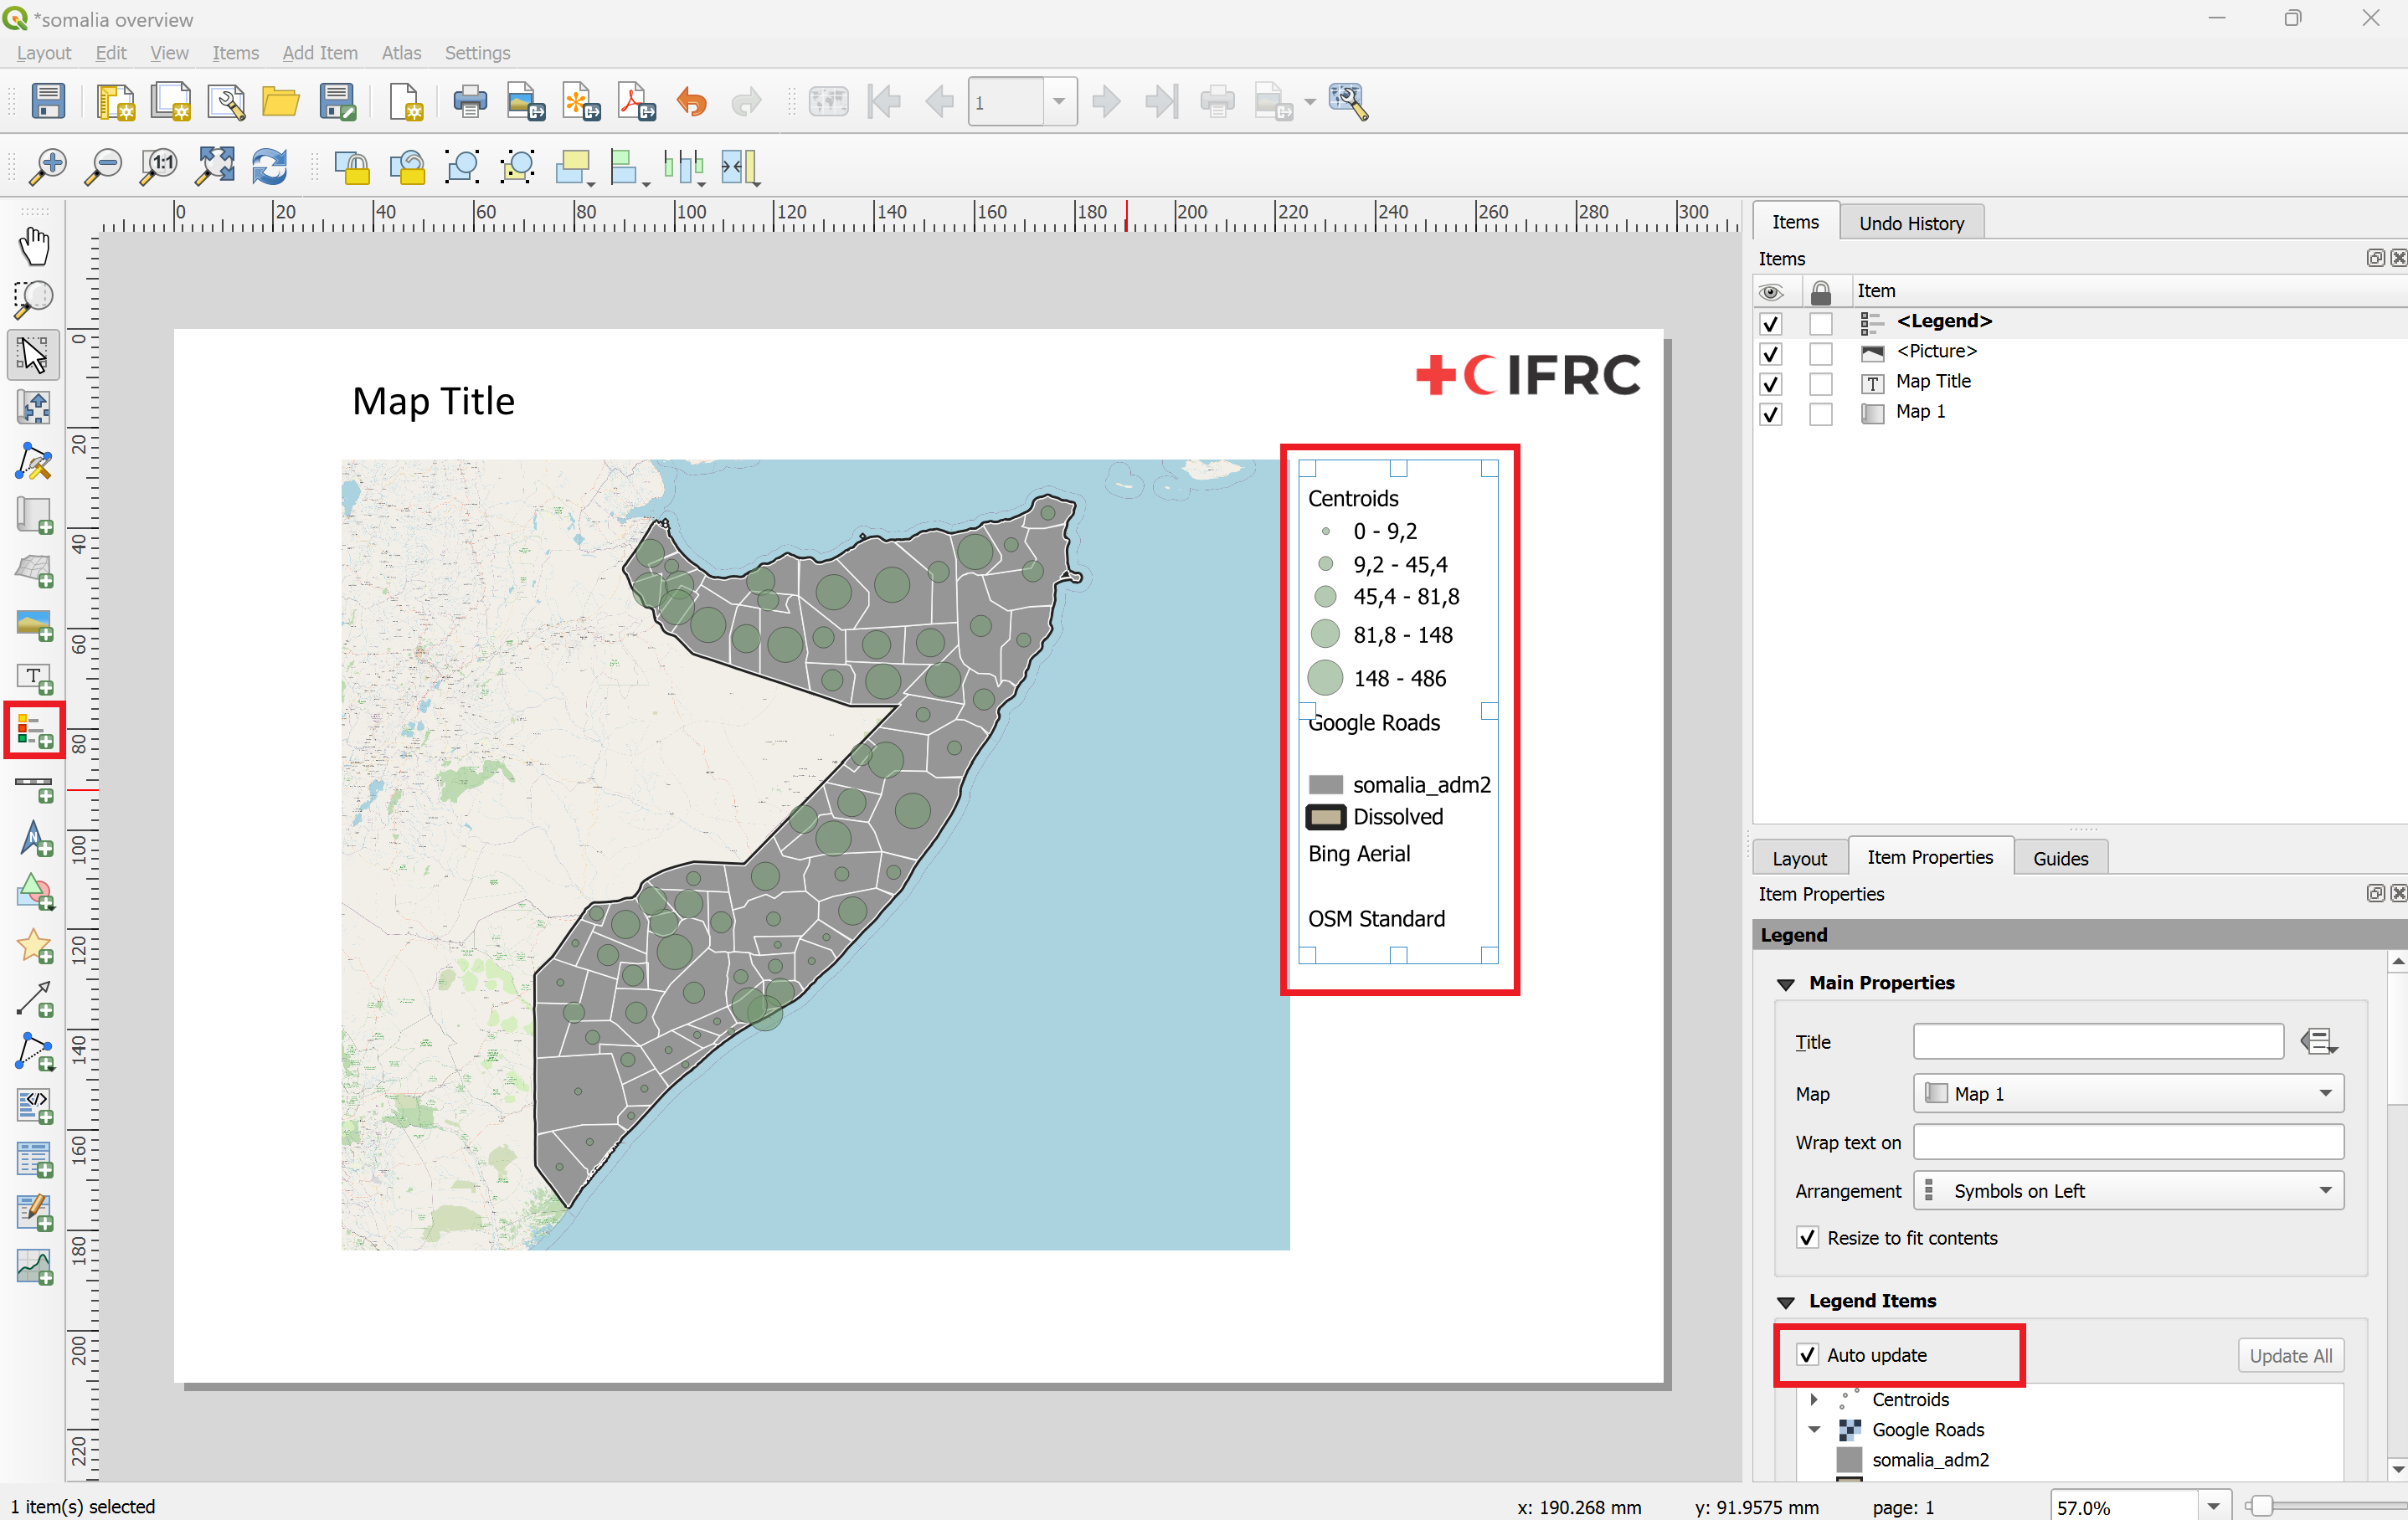
Fig. 120 Adding a legend to the print layout#
In the Item Properties panel, if you keep the Auto update option checked, new layers added to your project will automatically be added to the legend but you cannot control them individually (rename if necessary, reorder ot remove items).
Once the option is unchecked, you can update the name of the layers, group them, remove or reorganise them, etc.
If you have to many items on your legend, and they don’t fit on your map horizontally, you can also split the legend into several columns by navigating through the Item Properties panel, expand the Columns-section, and increase the Count.
Sometimes the space on your map is not suited for a single vertical legend. In this case, it is useful to add multiple columns. Make sure to group the legend items logically so that the vertical legend is easier to read.
Adding a scale bar#
Before adding a scale bar, select your main map and check in the Item Properties panel that the Scale field has a round number

Fig. 121 Make sure that the scale is at a round number#
To add a scale bar, you can use the 
Add scale bar-button on the left toolbar. In the Item Properties panel, customize the following functions
Which Map is related to the scale
Unit system of the bar (metres, miles, degrees)
Segments on the left: segments shown before 0 m (always set to 0).
Fixed width: define the width of each segment (e.g. 1 km, 10 km, 50 km, …).
Height: height (thickness) of the scale bar
There are many other options to customize the scale bar (change the font, colours, etc.).
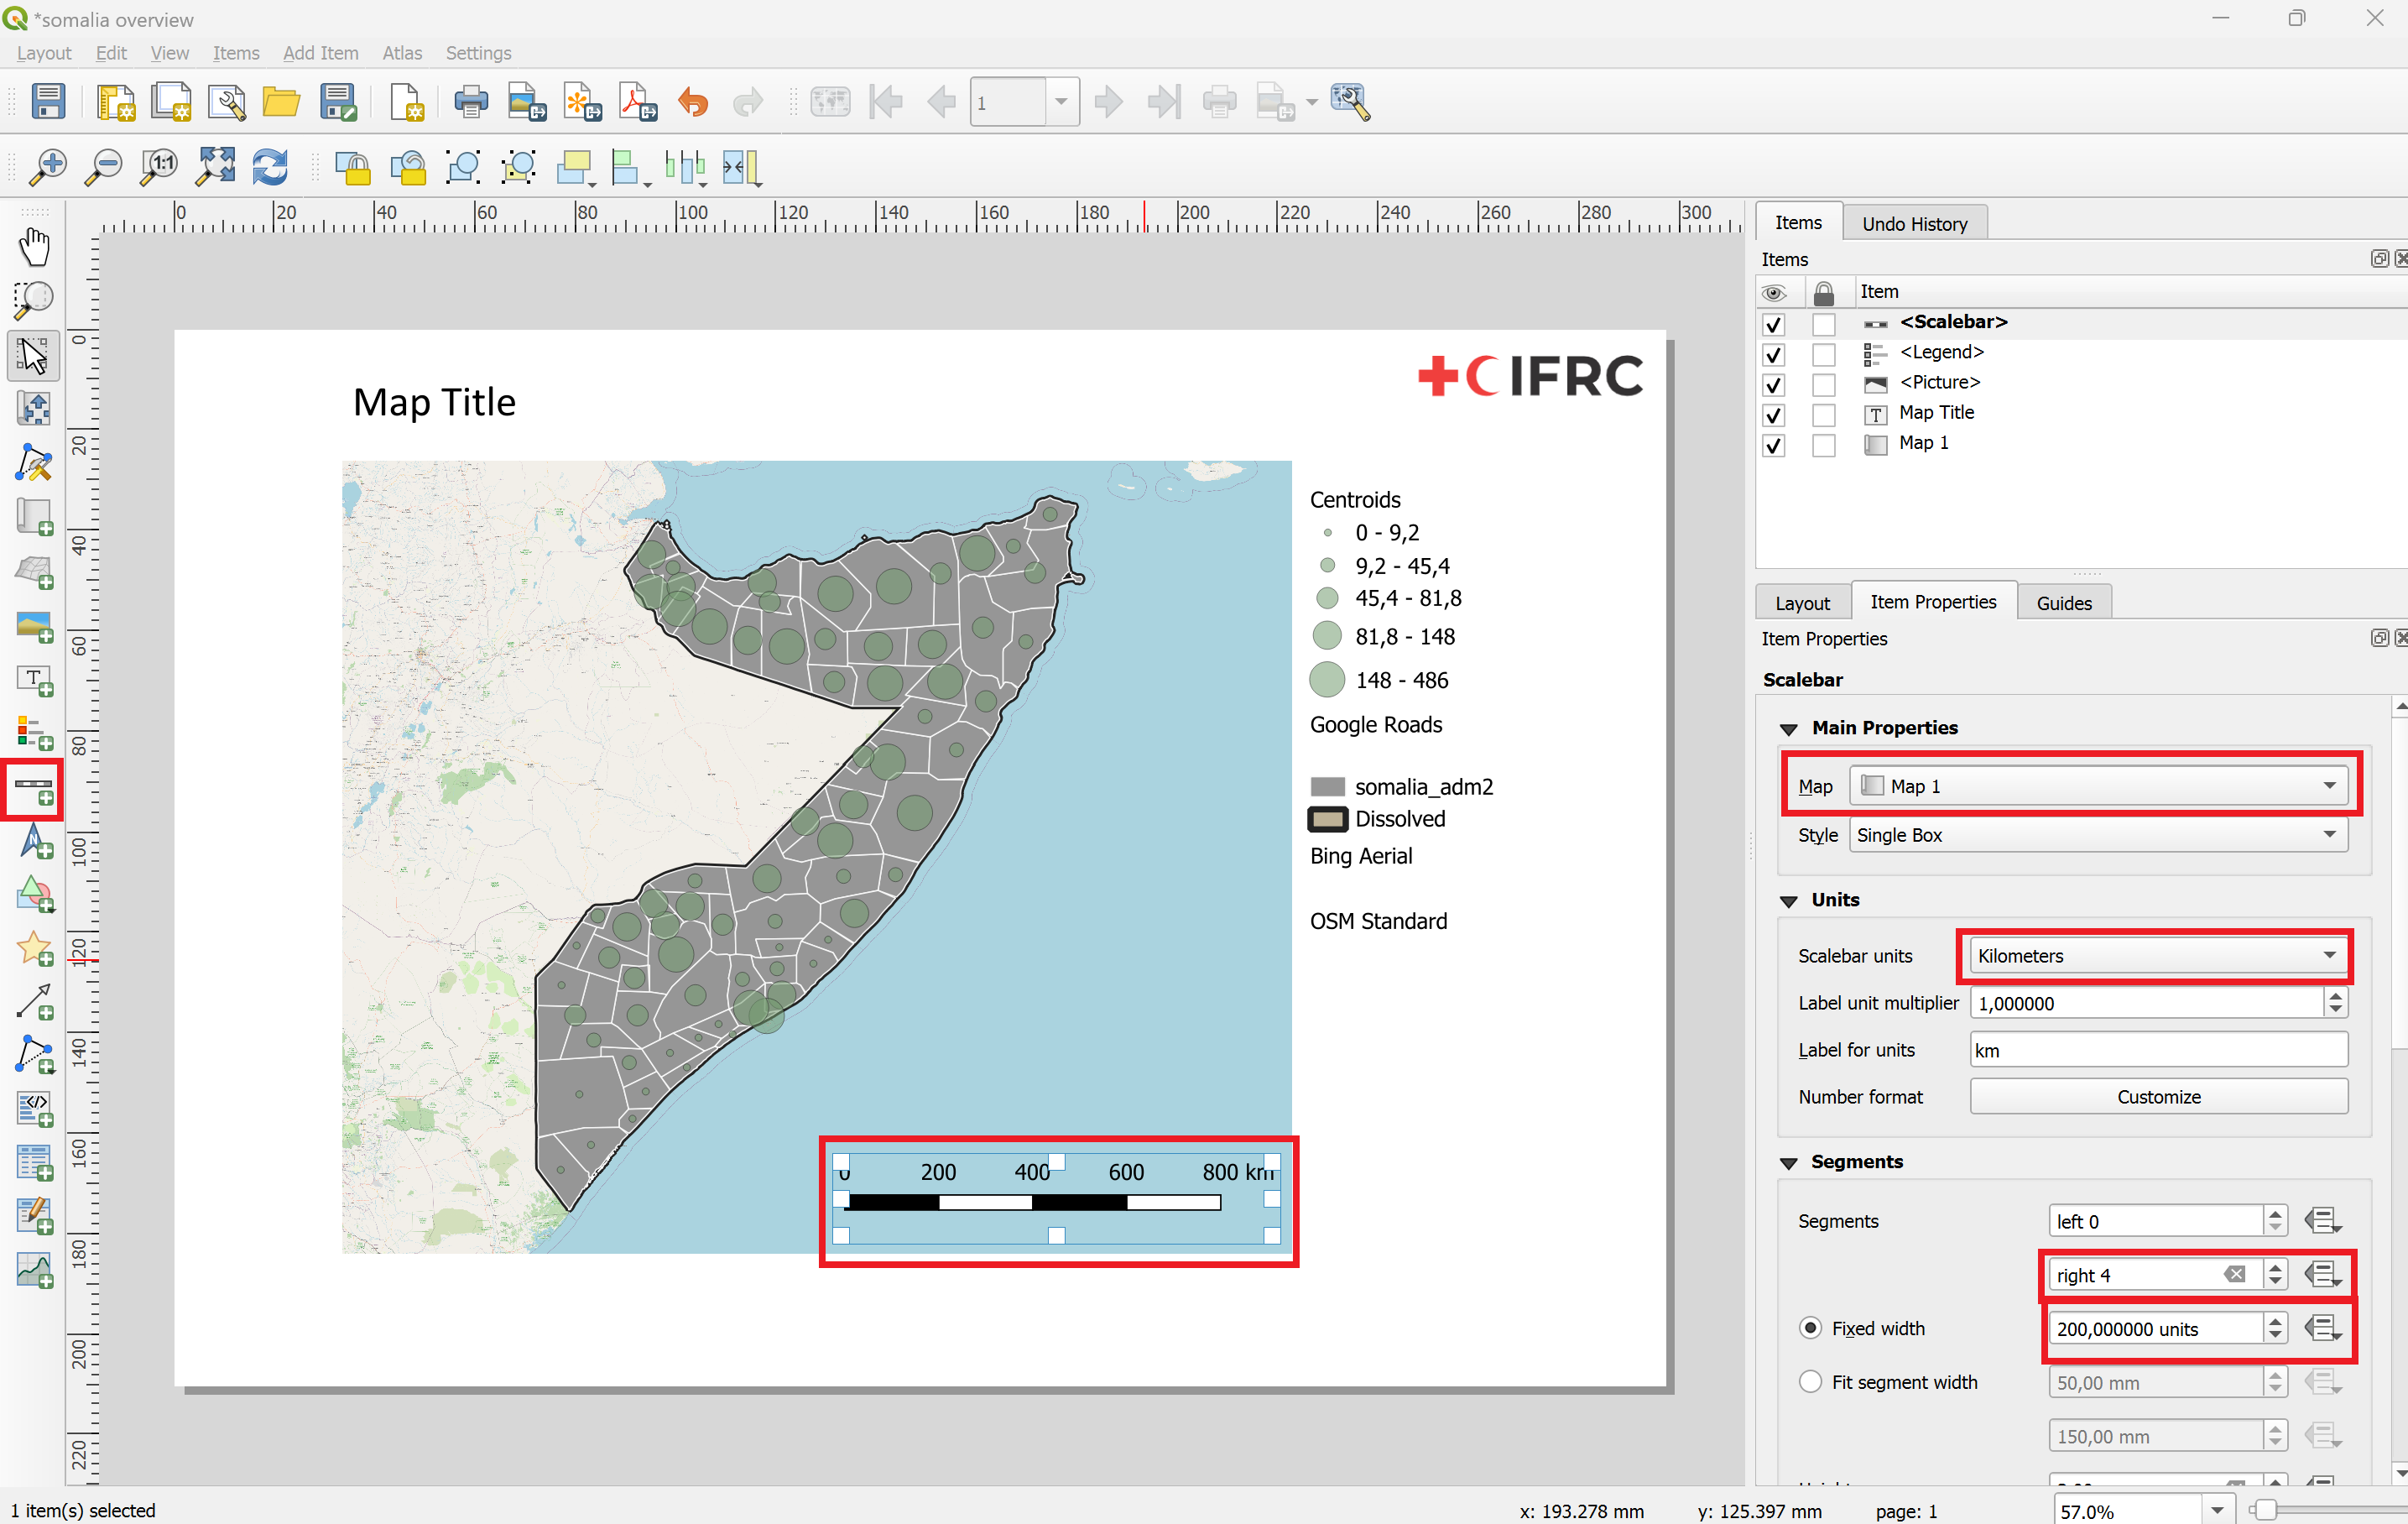
Fig. 122 Add and customise the scale bar#
Adding an overview map#
Adding an overview map in the corner of your map will help locate the area you are viewing on the main map.
To create an overview map, you need to follow these steps:
Make sure that you lock the layers and layer styling for your main map
Navigate to the item properties panel >
Prepare a layer with national or subnational borders or important landmarks in your project (e.g: Administrative boundaries, Capitals). These should not be the same layers as your main map. If necessary, you can duplicate layers you wish to use on the overview map (such as administrative boundaries). Do not change the layers of your main map, if you intend to change the symbology later on.
Insert the overview map into your print layout, by using the

Add Maptool (in the bottom right corner, for example)Lock the new map in the Item properties panel
Add a rectangle to display the extent of your main map
Go to the properties of your Main map > scroll down until you see “Overviews”.
Add an Overview by clicking on the
+-button.Link the main map by selecting it in the
Map frameoption.
Fig. 123 An overview map should show important landmarks and borders so the reader is able to locate the region shown on the map without having specific knowledge of the region.#
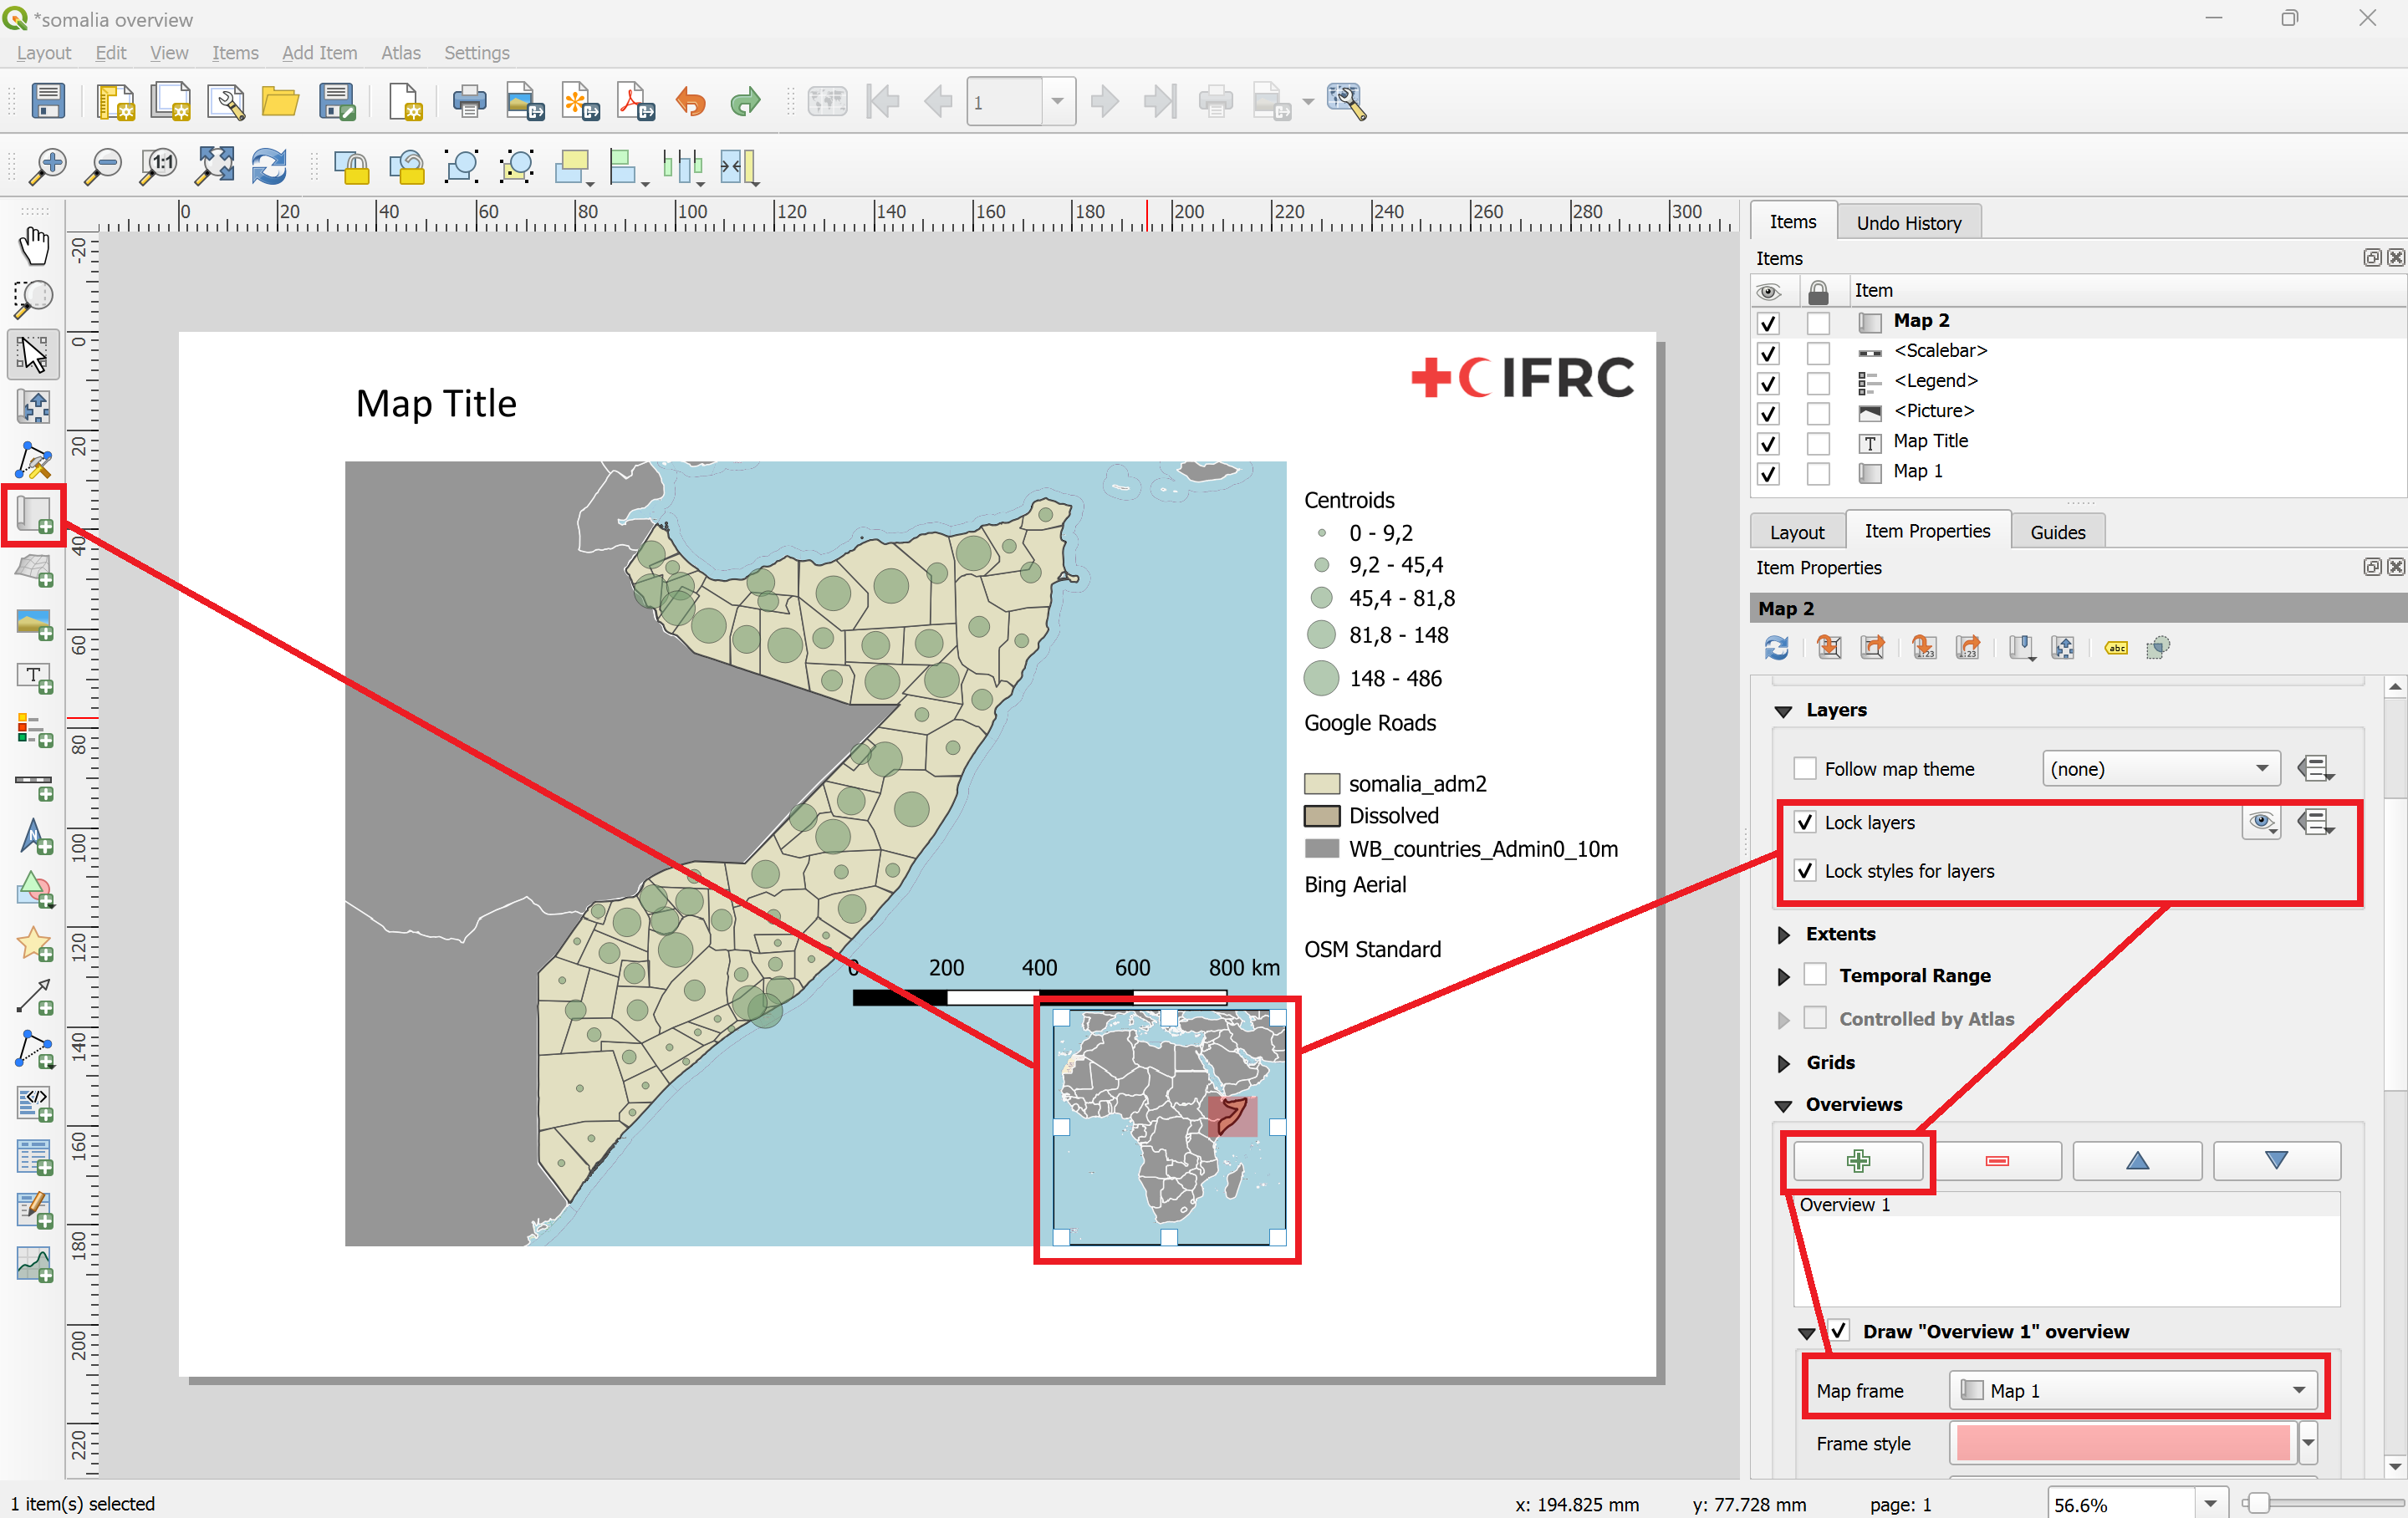
Fig. 124 Add an overview map and lock the layer#
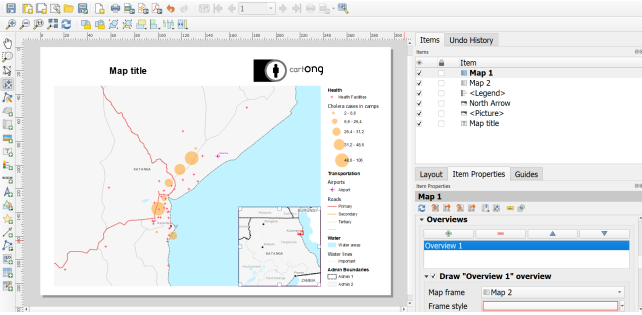
Fig. 125 Add a the extent of the main map to your overview map (the red rectangle in the bottom right corner)#
Video: Setting up an overview map
Caution
This method requires you to be sure that you are not going to modify the overview map, as once the layers are locked, they will keep the style, and any updates will not affect the overview map.
Exporting the print layout#
Once you are finished with the map composition, it is time to export export the print layout as a PDF or SVG file.
In the toolbar above the canvas, click on the

Export as PDF-button.Give the new file a name and select the location you want to save it.
Click on
Save.A new window “PDF Export Options” will open. Here you can adjust the compression algorithm. For the best results, select the lossless image compression.
Click
Saveagain.A new green bar will pop up underneath the toolbars. Click on the file link to review the exported map.
Note
Make sure to check the map after exporting the PDF as some design elements might have changed in the exporting process.
Map Templates#
Map templates can simplify and speed up the creation of a print layout by saving the arrangement of elements. However, they do not save the project’s layers and images, which will need to be reconfigured each time. If you work for an organisation that frequently publishes maps, or you need to create several maps on the same topics but in different regions or times, you can use map templates to skip the arrangement of elements.
Note
The individual layers, maps and images are not saved in the template. However, if you have the same layers in the project you load the template into, the legend will update accordingly.
Once you are satisfied with your map layout, click on the

Save as template-button in the toolbar above the canvas to save it as a new template.Choose a location where you want to save the template. Ideally, you should choose the template directory.
Click
Save.You can open the template by dragging it into a QGIS-project.
You can drag and drop template-files (.qpt, QGIS template file) into QGIS or use the Layout manager.
Open the Layout manager under
Layout>Layout ManagerNavigate to the section “New from Template”
Choose
Specificand select the location where you saved your templateClick open.
The template directory is where QGIS stores layout templates. If you have templates saved here, you can load templates directly through the layout manager without selecting the file.
On Windows computers, the file path is \Users\AppData\Roaming\QGIS\QGIS3\profiles\default\composer_templates.
Tip
The layout manager in QGIS already has a dedicated location for map templates. On Windows computers, the file path is \Users\AppData\Roaming\QGIS\QGIS3\profiles\default\composer_templates.
If you save templates here, you can load templates directly through the layout manager without looking for the file.
You can also add file paths in the QGIS template settings.
The Atlas function (automatic map generation)#
In some cases, it can be necessary to create multiple maps for different locations with the same layers. For example, if you have a detailed dataset on affected flood areas in Nigeria, you can create a more detailed map for each subnational district. In QGIS, this can be done automatically with the Atlas Function.
The Atlas Function can be found in the Print Layout Composer on the toolbar.

Fig. 126 Atlas Toolbar#
If you can’t see the Atlas Tools, you must first activate the Atlas Toolbar under View > Toolbars > Atlas Toolbar.
Generating an Atlas#
An atlas will generate a new page with the same map layout for each feature in a layer. For most purposes, it useful to first create a map layout with the elements such as legend, sources and overview map and then insert the map item that will be controlled by the Atlas. To generate an atlas:
Click on the

Atlas Settings-button in the Atlas Toolbar.In the new window, activate the
Generate an Atlasoption.Select the
Coverage Layer. This will determine the features or polygons that will be displayed on a page. In our example, we will use the subnational administrative districts in Nigeria (ADM1).Select the
Page Name. This should be the name of the subnational district or location that is displayed on that page. To display the name of the district, we will chooseADM1_REF.Now let’s add a map to the empty print layout.
Click on the map and navigate to the Layer Properties window on the right.
Scroll down until you see the option
Controlled by Atlasand activate it.Now activate the preview of the Atlas in the Atlas Toolbar. Otherwise, the print layout will not update to show you the atlas page. You can click through each page to see how it looks. Depending on the amount of features on your map, they may take a while to render.
Now you can adjust the Margin options to best fit the readability of the map. By default, it is set to 10% and this should fit most purposes.
Before printing or exporting the atlas, make sure to check every page that other elements of the map do not cover the represented region.
Note
The only item in the print layout that is being controlled by the atlas is the map we added (unless you specify otherwise in the item properties). The other elements of the map will be the same on every page.