Attribute Table in QGIS #
The attribute table, a core component of Geographic Information Systems (GIS), organizes and presents detailed information about features in a selected layer. Each row in the table represents a feature, while columns store specific attributes. This table facilitates searching, selection, sorting, filtering, and editing of features.
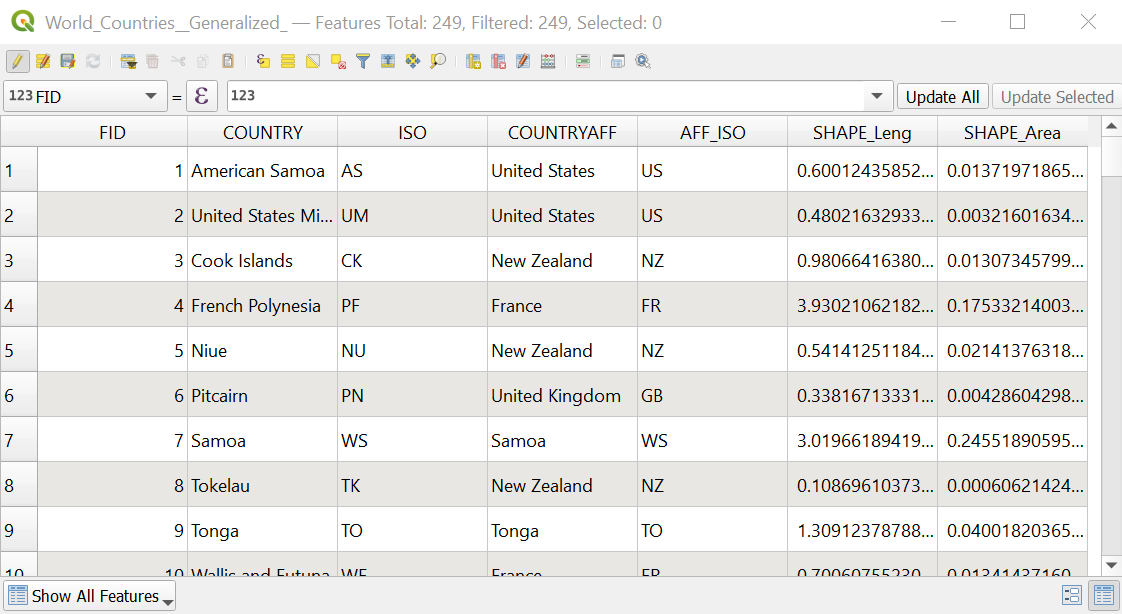
Fig. 13 Example of an attribute table in QGIS.#
Attribute Table-Basics #
Open the attribute table and sort features #
Open Attribute Table: Right click on your layer and select
Open Attribute Table.Sort column: Click on a column header.
Manually select features in the attribute table #
Select: Click on the lines of the features.
Multi Select: To select multiple features press Ctrl (Cmd on MacOS) and select
features.Show only selected features: In the bottom left of the attribute table open the dropdown menu and select
Show selected features. To show again all features click onShow all features.Only show unselected features Select features and click on

Unselect feature #
Unselect: Click on
 or use Ctrl + Shift + A.
Zoom in on a specific feature #
Zoom: Right click on your feature and select
Zoom To Feature.
Table view vs Form view #
QGIS provides two views to easily manipulate data in the attribute table:
Table View:
 This mode presents the values of multiple features in a tabular format, where each row corresponds to a feature, and each column represents a field.
Form view:!
/fig/mActionFormView.pngThis mode shows all attributes of one selected feature.
To switch between these modes use the  buttons in the down right corner of the attribute table.
Attribute Table - Data Editing #
Change data in the attribute table #
Open Attribute table: Right click on your layer and select
Open Attribute TableEdit Data: Activate editing mode by clicking on

Navigate to the feature and select the attribute you want to edit.
Make your edits.
Save edits: Click on
 or deactivate editing mode by clicking on and accept the changes by saving your layer.
Add a new column #
Add new column: Activate editing mode by clicking on
→ click on  , the window
 Add Fieldwill open.Specify column variables: Fill the window and click
OK.Name= Name of columnComment= Additional info about columnType= Select the type of data the column will have.Table of data types below.
Type |
Property |
|---|---|
Whole number (integer) |
Whole numbers like counts, quantities, or IDs. |
Whole number (integer 64-bit) |
Larger whole numbers for very big counts. |
Decimal number (real) |
Numbers with decimal points, useful for measurements and fractions. |
Text (string) |
Alphanumeric characters, such as names and descriptions. |
JSON (string) |
Structured text data often used for complex information. |
Date |
Specific calendar dates. |
Date & Time |
Dates and times together |
Binary object (BLOB) |
For storing binary data like images, audio, or files. |
Boolean |
Simple true/false or yes/no values. |
Delete columns #
Delete column: Activate editing mode by clicking on
Click on

Select the columns you want to delete
Click on
OKClick on
Hint
To select multiple columns press Ctrl and select columns.
Buttons and shortcuts of the Attribute Table #
Below all buttons of the attribute table are listed.
Icon |
Description |
Purpose |
Shortcut |
|---|---|---|---|
|
Toggle editing mode |
Enable editing functionalities |
|
|
Toggle multi-edit mode |
Update multiple fields of many features |
|
|
Save edits |
Save current modifications |
|
|
Reload the table |
||
|
Add feature |
Add new geometryless feature |
|
|
Delete selected features |
Remove selected features from the layer |
|
|
Cut selected features to clipboard |
|
|
|
Copy selected features to clipboard |
|
|
|
Paste features from clipboard |
Insert new features from copied ones |
|
|
Select features using an Expression |
||
|
Select All |
Select all features in the layer |
|
|
Invert selection |
Invert the current selection in the layer |
|
|
Deselect all |
Deselect all features in the current layer |
|
|
Filter/Select features using form |
|
|
|
Move selected to top |
Move selected rows to the top of the table |
|
|
Pan map to the selected rows |
|
|
|
Zoom map to the selected rows |
|
|
|
New field |
Add a new field to the data source |
|
|
Delete field |
Remove a field from the data source |
|
|
Organize columns |
Show/hide fields from the attribute table |
|
|
Open field calculator |
Update field for many features in a row |
|
|
Conditional formatting |
Enable table formatting |
|
|
Dock attribute table |
Allows to dock/undock the attribute table |
|
|
Actions |
Lists the actions related to the layer |


