Digitisation#
Digitisation is the process of converting geographic data from maps or images into a digital form commonly represented as vector data. Proficiency in digitisation stands as a cornerstone for GIS specialists. It empowers them to convert spatial information into a digital format, facilitating more efficient data manipulation compared to traditional methods of interpreting images or paper maps.
Digitisation in humanitarian work
If you want to know how community mapping and digitisation can help improve the resilience of communities and facilitate humanitarian work, take a look at Paul Knight’s blogpost “This is the first time this community is on a map…” — Digital Community Mapping in Nigeria
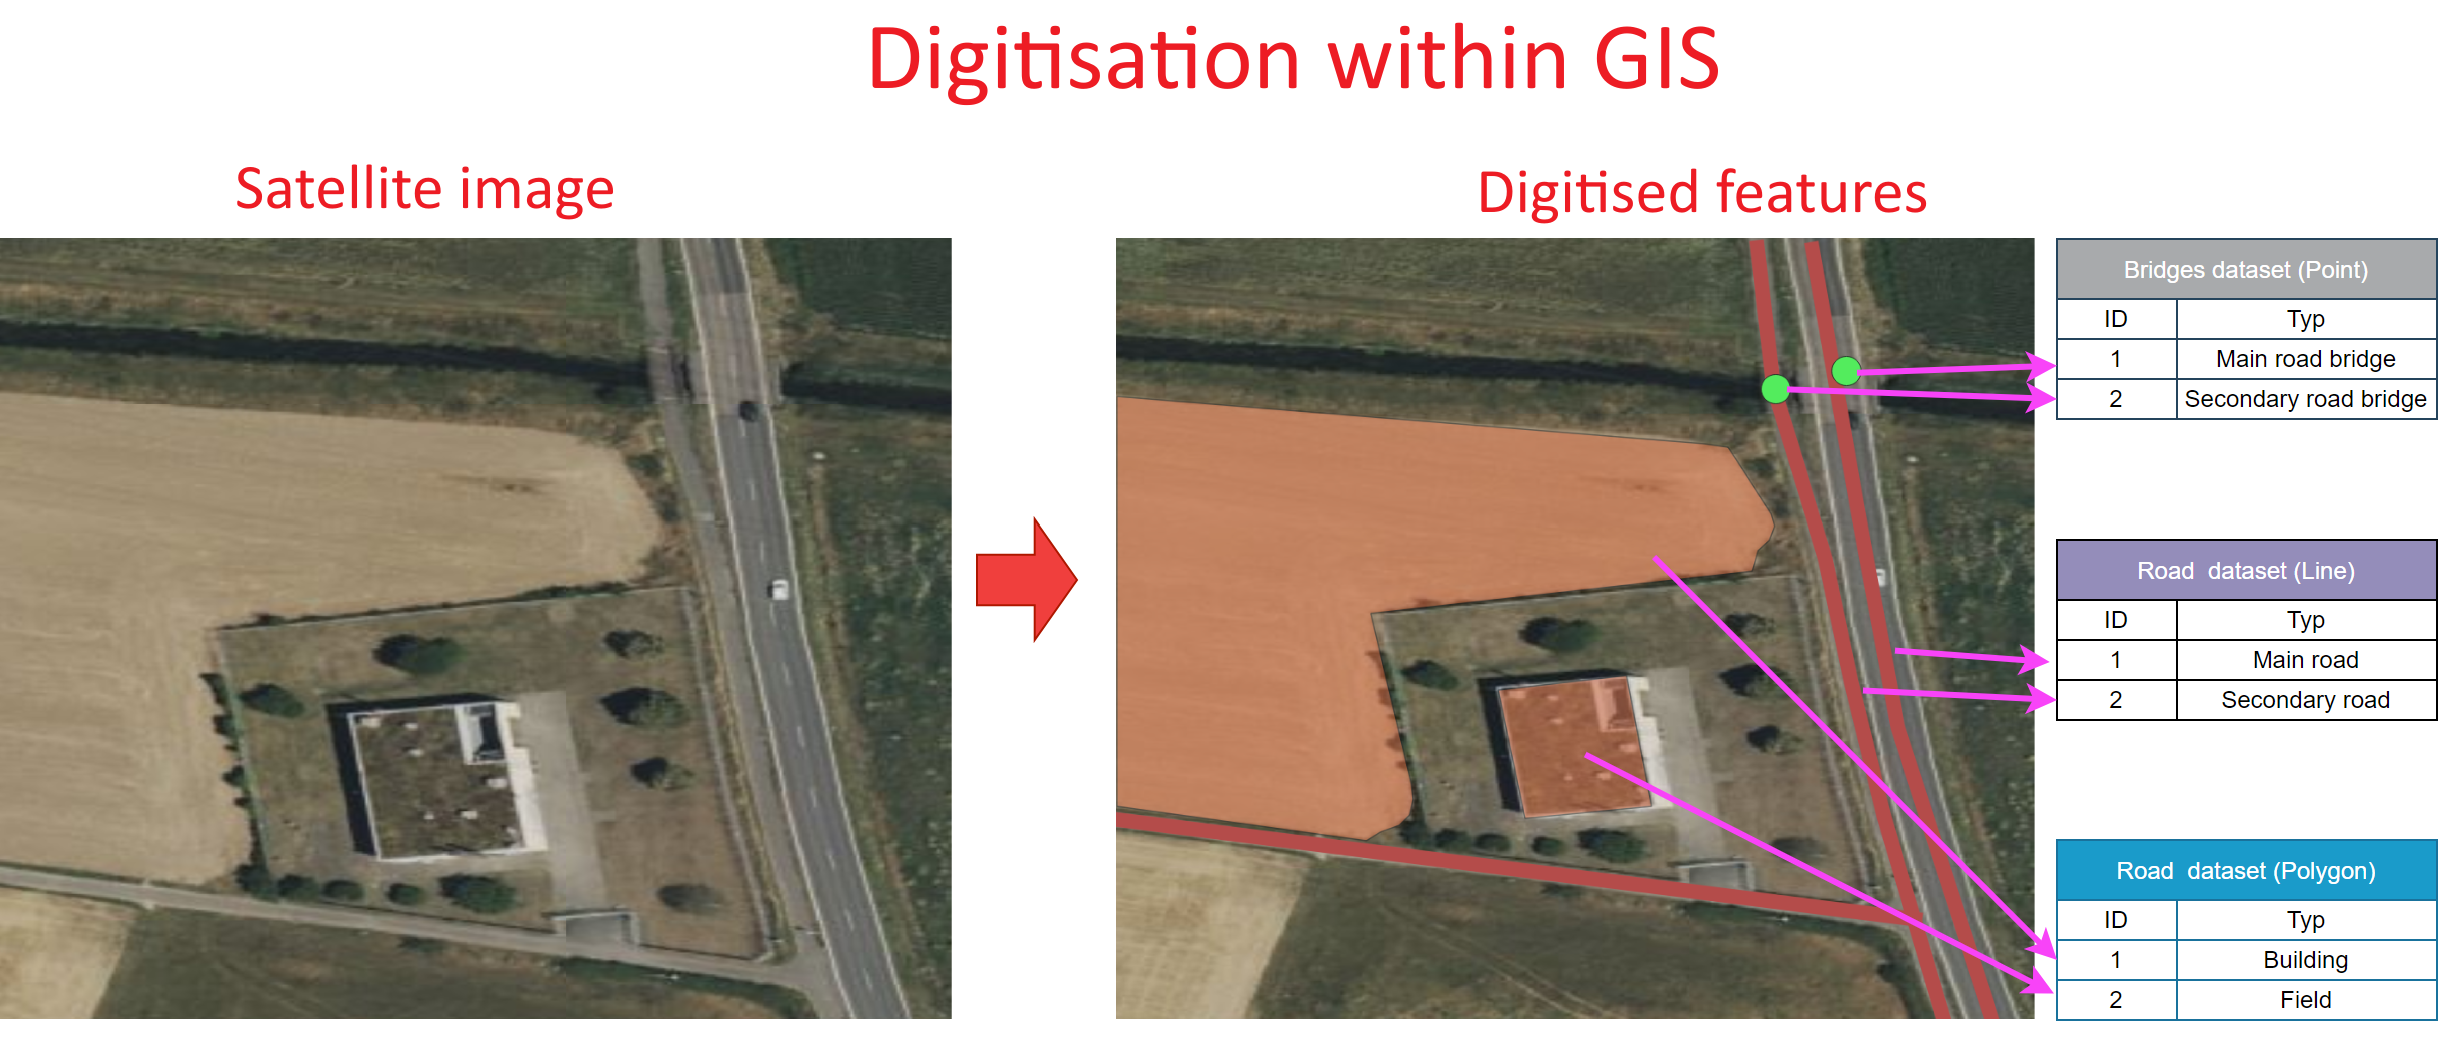
Fig. 51 The concept of digitisation within GIS. Source: HeiGIT#
Digitising in QGIS#
In QGIS,digitisation involves tracing features such as points, lines, or polygons directly on the map canvas to represent geographic elements like buildings, roads, or land parcels. Additionally, you can assign attributes to each feature during digitization, enabling further analysis and integration with other geospatial data. This digitized data becomes a valuable asset for spatial analysis and mapping.
Real world Scenario 1/3
There has been a flood in a village following heavy rains.
To assess the needs of the household and the impact on the
infrastructure, you are tasked to make an overview map of the region and mark the flood impacted buildings and
roads. However, there are no datasets with the buildings or roads available. For the map, you will have to
create two new layers with the road network and the buildings. However, there is recent satellite imagery available.
With these images, you can create vector layers representing the key infrastructure, such as buildings and roads.
Once you have created the layers, you can create a preliminary overview map of the village.
This map will be given out to community members and voluntaries on the ground to map out the damaged infrastructure.
In a next step, the information collected by the ground team can be used to enrich the data and create an flood
impact assessment.
To create the map, you will need to create new vector layers.
Digitisation toolbars#
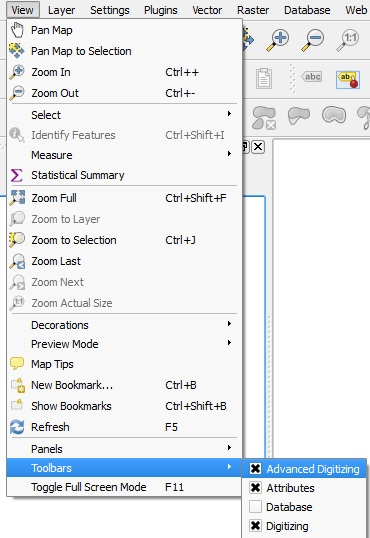
Fig. 52 The Digitisation Toolbar in QGIS 3.36.#
Digitising is done with the Digitizing Toolbar and on the map canvas.
First, you need to check if the Digitizing Toolbar is activated. To do that
Click on the
Viewtab in the menu bar and clickToolbars. Check if theDigitizingandAdvanced Digitizingtoolbar is activated.
First, you need to check if the Digitizing Toolbox is activated. To do that
Click on the
Viewtab in the menu bar and clickToolbars. Check if theDigitizingandAdvanced Digitizingtoolbox is activated.A tool box like this should appear on top of the QGIS interface
The digitisation toolbar offers the basic tools to create, save, and edit features. However, for everything that goes above just creating new features and deleting features, the Advanced Digitalization toolbar is needed (see Fig. 53). The Advanced Digitalization toolbar allows you to move features, delete parts of features, and much more. All functions are listed in the two tables below.
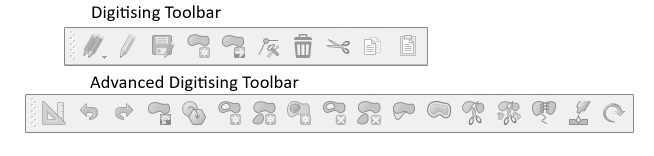
Fig. 53 Digitizing Toolbar in QGIS 3.36#
Digitalization Toolbar
Tool |
Purpose |
Tool |
Purpose |
|---|---|---|---|
|
Access to save, rollback or cancel changes in all or selected layers simultaneously |
|
Turn on or off edit status of selected layer(s) based on the active layer status |
|
Save edits |
||
|
Digitise using straight segments |
|
Digitize using curve lines |
|
Enable freehand digitising |
|
Digitise polygon of regular shape |
|
Add new record |
|
Add Feature: Capture Point |
|
Add Feature: Capture Line |
|
Add Feature: Capture Polygon |
|
Vertex Tool (All Layers) |
|
Vertex Tool (Current Layer) |
|
Set whether the vertex editor panel should auto-open |
|
Modify the attributes of all selected features simultaneously |
|
Delete selected features from the active layer |
|
Cut features from the active layer |
|
Copy selected features from the active layer |
|
Paste features into the active layer |
|
Undo changes in the active layer |
|
Redo changes in active layer |


For more complex digitisation procedures, you will use the advanced digitisation toolbar. However, for this chapter, we will focus on the normal digitisatin toolbar.
Advanced digitizing Toolbar
Tool |
Purpose |
Tool |
Purpose |
|---|---|---|---|
|
Enable Advanced Digitizing Tools |
||
|
Move Feature(s) |
|
Copy and Move Feature(s) |
|
Rotate Feature(s) |
|
Simplify Feature |
|
Scale Feature |
||
|
Add Ring |
|
Add Part |
|
Fill Ring |
|
Swap direction |
|
Delete Ring |
|
Delete Part |
|
Offset Curve |
|
Reshape Features |
|
Split Parts |
|
Split Features |
|
Merge Attributes of Selected Features |
|
Merge Selected Features |
|
Rotate Point Symbols |
|
Offset Point Symbols |
|
Trim or Extend Feature |


Creating new datasets#
To digitise new data, you always have to start with creating the dataset before filling it with digitised data. Keep in mind that one layer can only contain one type of geometry: either points, lines, or polygons. When you create a dataset, you will have to choose the type of geometry. Additionally, you can add further columns with attributes to add more data to the data table.
Now it’s your turn!
Think of a spatial dataset you could need in your humanitarian operations. What kind of additional information is useful? How would you collect it? This could range from type of road, crops planted, type of vegetation or social indicators. You can discuss in groups and write it down on paper or add it to a digital whiteboard.
Video: How to create a new dataset
Layer–>Create Layer->New GeoPackage LayerorNew Shapefile LayerClick on
 next to the
 file nameinput field and navigate to the folder where you want to save the dataset.File encoding: Make sure this is set to UTF-8Geometry type: Select the type of feature you want to digitise e.g. points or lines.Under
Additional dimensionyou should always make sure that you checkNone. Except if there is the possibility to collect the Z-values (elevation) as well. But this is mostly not the case.CRS dropdown: Select the EPSG/CRS you want to set for the new layer. By default, the QGIS selects the project CRS. If you want to change the CRS click on
 .
.Under
New Fieldyou can add columns to the new layer. Here you can set up what other type of data you want to collect in this dataset.Type: Select the data type the column will have e.g.Text,Whole number,Decimal Number,Date.Click on
 to add the new column to the
 Fields List.
Click
OKto create the new data
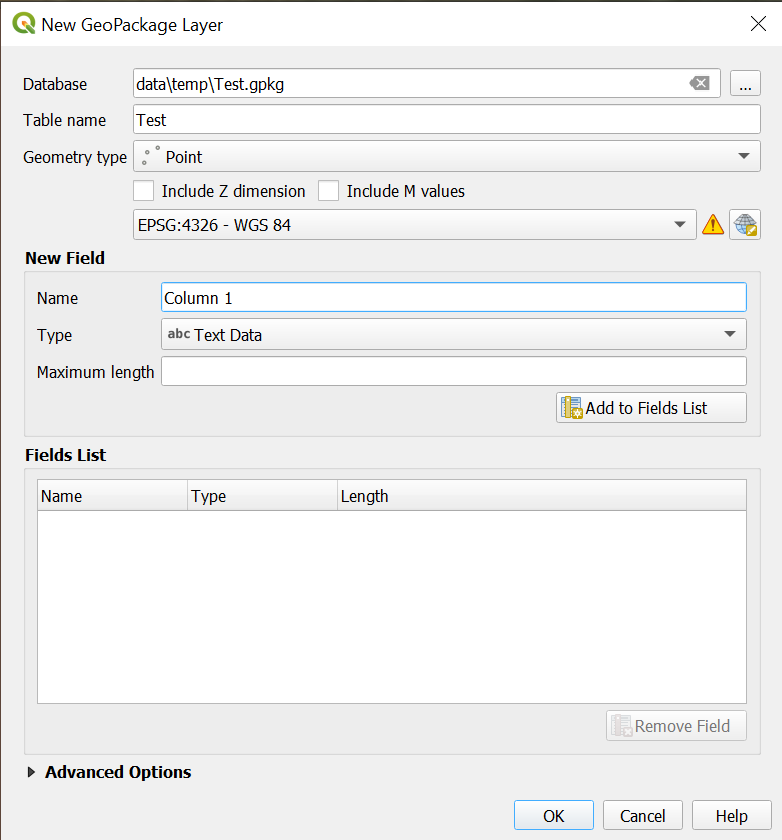
Fig. 54 The Layer Creation window in QGIS 3.36.#
Attention
An important concept to understand before starting to add data to datasets is, that, whenever you make changes
to a dataset other than styling, you have to put it in editing mode. This is done by selecting the layer and
clicking on 
Toggle Editing. Now, the buttons for many functions of the
digitisation toolbar are clickable.
After you are done manipulating the layer click on 
Save Layer Edits to save
your edits.
Once you have set up the new layer, you can start adding geofeatures. The process for the three geometric types is basically the same:
Creating new data entries#
Select the layer you want to add data to in the Layer panel.
Go to the digitisation toolbar and click on
Toggle Editing. Make sure the the layer is in the editing mode. If not, click on the icon in the
digitisation toolbar.
Creating point data#
Select the point layer you want to add data to in the Layer panel.
Go to the digitisation toolbar and click on
Toggle Editing. Make sure the the layer is in the editing mode. If not, click on the icon in the
digitisation toolbar.Click on
 .
.Left-click on the feature you want to digitise.
Once you click, a window will appear
[Your Layer Name]- Feature Attribute. Here you can add the information about this feature to the different columns, based on the attribute table of the layer.Once you are done with digitalization
to save your edits.Click again on
to end the editing mode.
Video: How to create point data
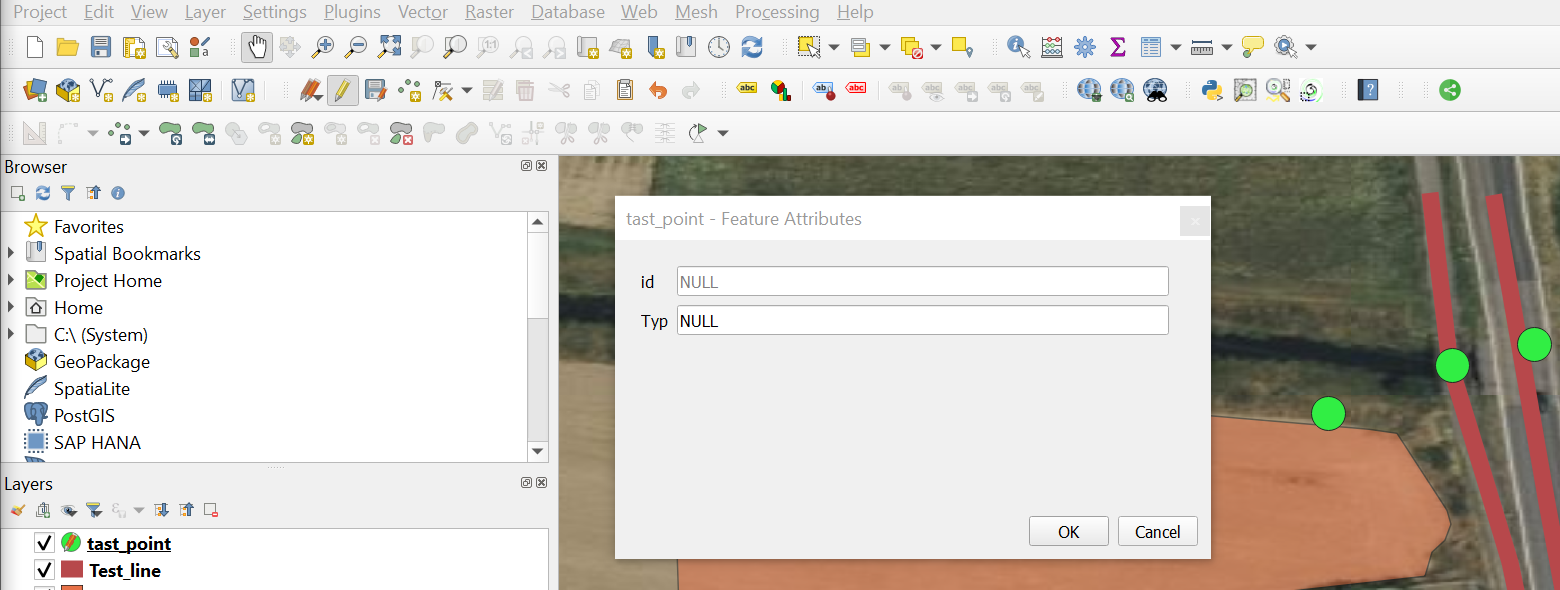
Fig. 55 Point creation.#
Getting coordinates from google maps
Sometimes, the easiest way to get the coordinates for a location, such as the office of a national Red Cross or Red Crescent branch or simply ofa house, is to use google maps. In Google Maps, you can right click on any location to get the coordinates (in degrees).
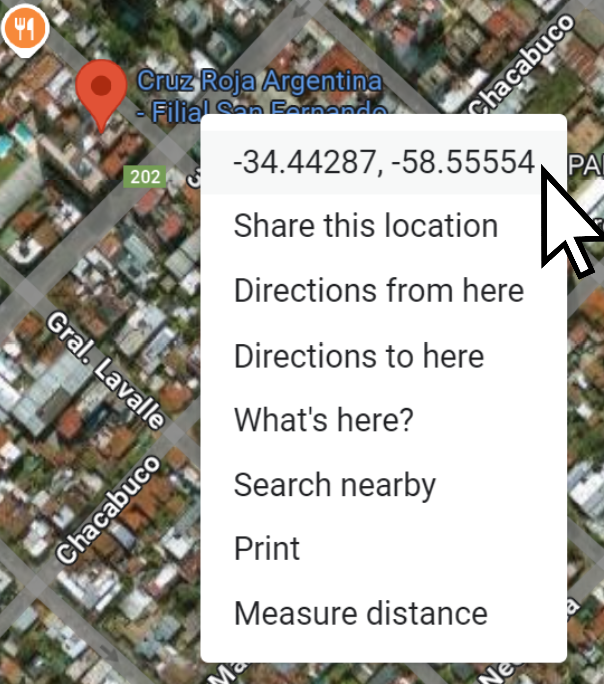
In Google Maps, locate the point you wish to add to your QGIS project.
Right click on the point and select the coordinates. They will be copied to your clipboard automatically.
Navigate to your QGIS project and paste the coordinates into the search bar in the bottom left corner of the QGIS window.
Select
Go to [Your coordinates] (EPSG 4326: WGS 84).The coordinate point will flash red on the map canvas.
Creating line and polygon layers#
The process of creating line or polygon layers is essentially the same as creating point data. The main difference is that instead of only adding one point, line and polygon geometries require several points (vertices). Each point you add is a vertext between two lines. In QGIS, you create lines and polygons by setting one point, and then another point connected to the previously added point. To finish adding the feature use the Right mouse botton.
Attention
Remember to change the geometry type into lines if you want to create a new line layer.
Creating line data works in the same way as creating point data (see above). First, you must create a new line layer or use an existing one.
Select the line layer you want to add data to in the Layer panel
Go to the digitisation toolbar and click on
. Now, the layer is in the
editing mode.Click on
 .
.To digitise line features, click along the line. When you are done, right-click on the last point of the line to finish the feature.
A window will appear
[Your Layer Name]- Feature Attribute. Here you can add the information about this feature to the different columns, based on the attribute table of the layer.Once you are done with digitisation, click on
Save Layer Editsto save your edits.Click on
Toggle Editingagain to end the editing mode.
The creation of polygon layers works in the same way as for point and line data.
Select the polygon layer you want to add data to in the Layer panel.
Go to the digitisation toolbar and click on
. Now, the layer is in the editing mode.Click on
 .
.To digitise polygon features, left-click around the area you want do digitize. When you are done, right-click on the last point of the area to finish the feature.
A window will appear
[Your Layer Name]- Feature Attribute. Here you can add the information about this feature to the different columns, based on the attribute table of the layer.Once you are done with digitisation
to save your edits.Click on
Toggle Editingagain to end the editing mode.
Real World Scenario 2/3
The first thing you do is locate the village using GPS-coordinates that you enter in the bottom right corner of
the QGIS window.
Thankfully, the process of digitising is relatively easy since there is a recent satellite image provided by
Microsoft Bing. You can load the satellite image using the QuickMapServices and searching and adding the
Bing Aerial Basemap.
You can see the buildings and roads on the satellite image. The next step will be to create new layers: one for
the roads and one for the buildings.
Editing the Data#
In some cases, you might want to modify or correct vector data because of inaccuracies or changes. Editing vector data is done with digitisation toolbar. In QGIS, you can edit both the geometries and the values in the attribute table.
Editing Geometries#
For all cases:
Select the layer you want to edit.
Click on
to activate the editing mode.Do your changes.
Save your edit by clicking on
.Click again on
to end the editing mode.
Tip
You can use the  &
&  buttons to reverse changes easily.
Note that this is only possible before you save the changes.
Select the layer you want to modify.
Go to the digitisation toolbar and click on
Toggle Editing.Click on
 and select the feature you want to delete (see the wiki).
Once you have selected the features, click on
 to delete the feature.
Once you are done with editing, click on
to save your edits.Click again on
to end the editing mode.
Note
Keep in mind that once you save the changes , you can no longer undo or recover the deleted features. The changes permanently change the datafile in your folder.
There are multiple methods to move features. Here we show the method that works the same for point, line, and polygon features. To do this, you need the Advanced Digitisation Toolbox.
Select the line layer you want to add data to in the Layer panel.
Go to the digitisation toolbar and click on
.Click on
 and click on the feature you want to move. Then, click on the location where you want to move the feature.
Once you are done with editing, click on
to save your edits.Click on
again to end the editing mode.
Select the line layer you want to add data to in the Layer panel.
Navigate to the digitisation toolbar and click on
.Click on
 .
.Now you can now move every vertex (corner) of a feature. Click on the vertex/corner you want to move and then click on the location where you want to move the vertex to.
Once you are done with editing click on
to save your edits.Click on
again to end the editing mode.
A ring in QGIS is a part inside a polygon that is not part of the polygon. Image a polygon representing a lake. The ring is an island in the lake. For a better understanding, watch the video below.
Select the line layer you want to add data to in the Layer panel.
Go to the digitisation toolbar and click on
.Click on
 .
.Create a ring by clicking the area you want to exclude. Right-click to close the ring.
Once you are done with editing, click on
to save your edits.Click on
again to end the editing mode.
Editing the attribute values#
Sometimes, you will have to edit the values in the columns of the attribute table. For example, the name of an administrative district is written incorrectly or differently, or a value has not been entered correctly. To do this, you will have to:
Open the attribute table
Click on
to enter into the editing mode.Choose the field that you want to edit.
Enter the corrected value.
Click on
to save your edits.Click on
again to exit the editing mode.
This process is called “Data cleaning” and is important when performing data analysis or manipulating data in any way. While collecting or digitising data, it is easy to make small mistakes, such as a wrong value, wrong value type, or a spelling mistake. When performing analyses, it is therefore important to investigate the attribute table for inconsistencies or errors. If these errors are not cleaned, the results will be incorrect and you might take the wrong conclusions!
Real world Scenario 3/3
With the new layers, you are ready to trace the buildings and roads in the new layers. You already have some knowledge about the condition of the roads (e.g., the road surface, quality, and if it is flooded) and the condition of the houses (e.g., if it is affected by a flood, if it has multiple stories, …). This is useful information that can be stored in the additional attributes in the data table.
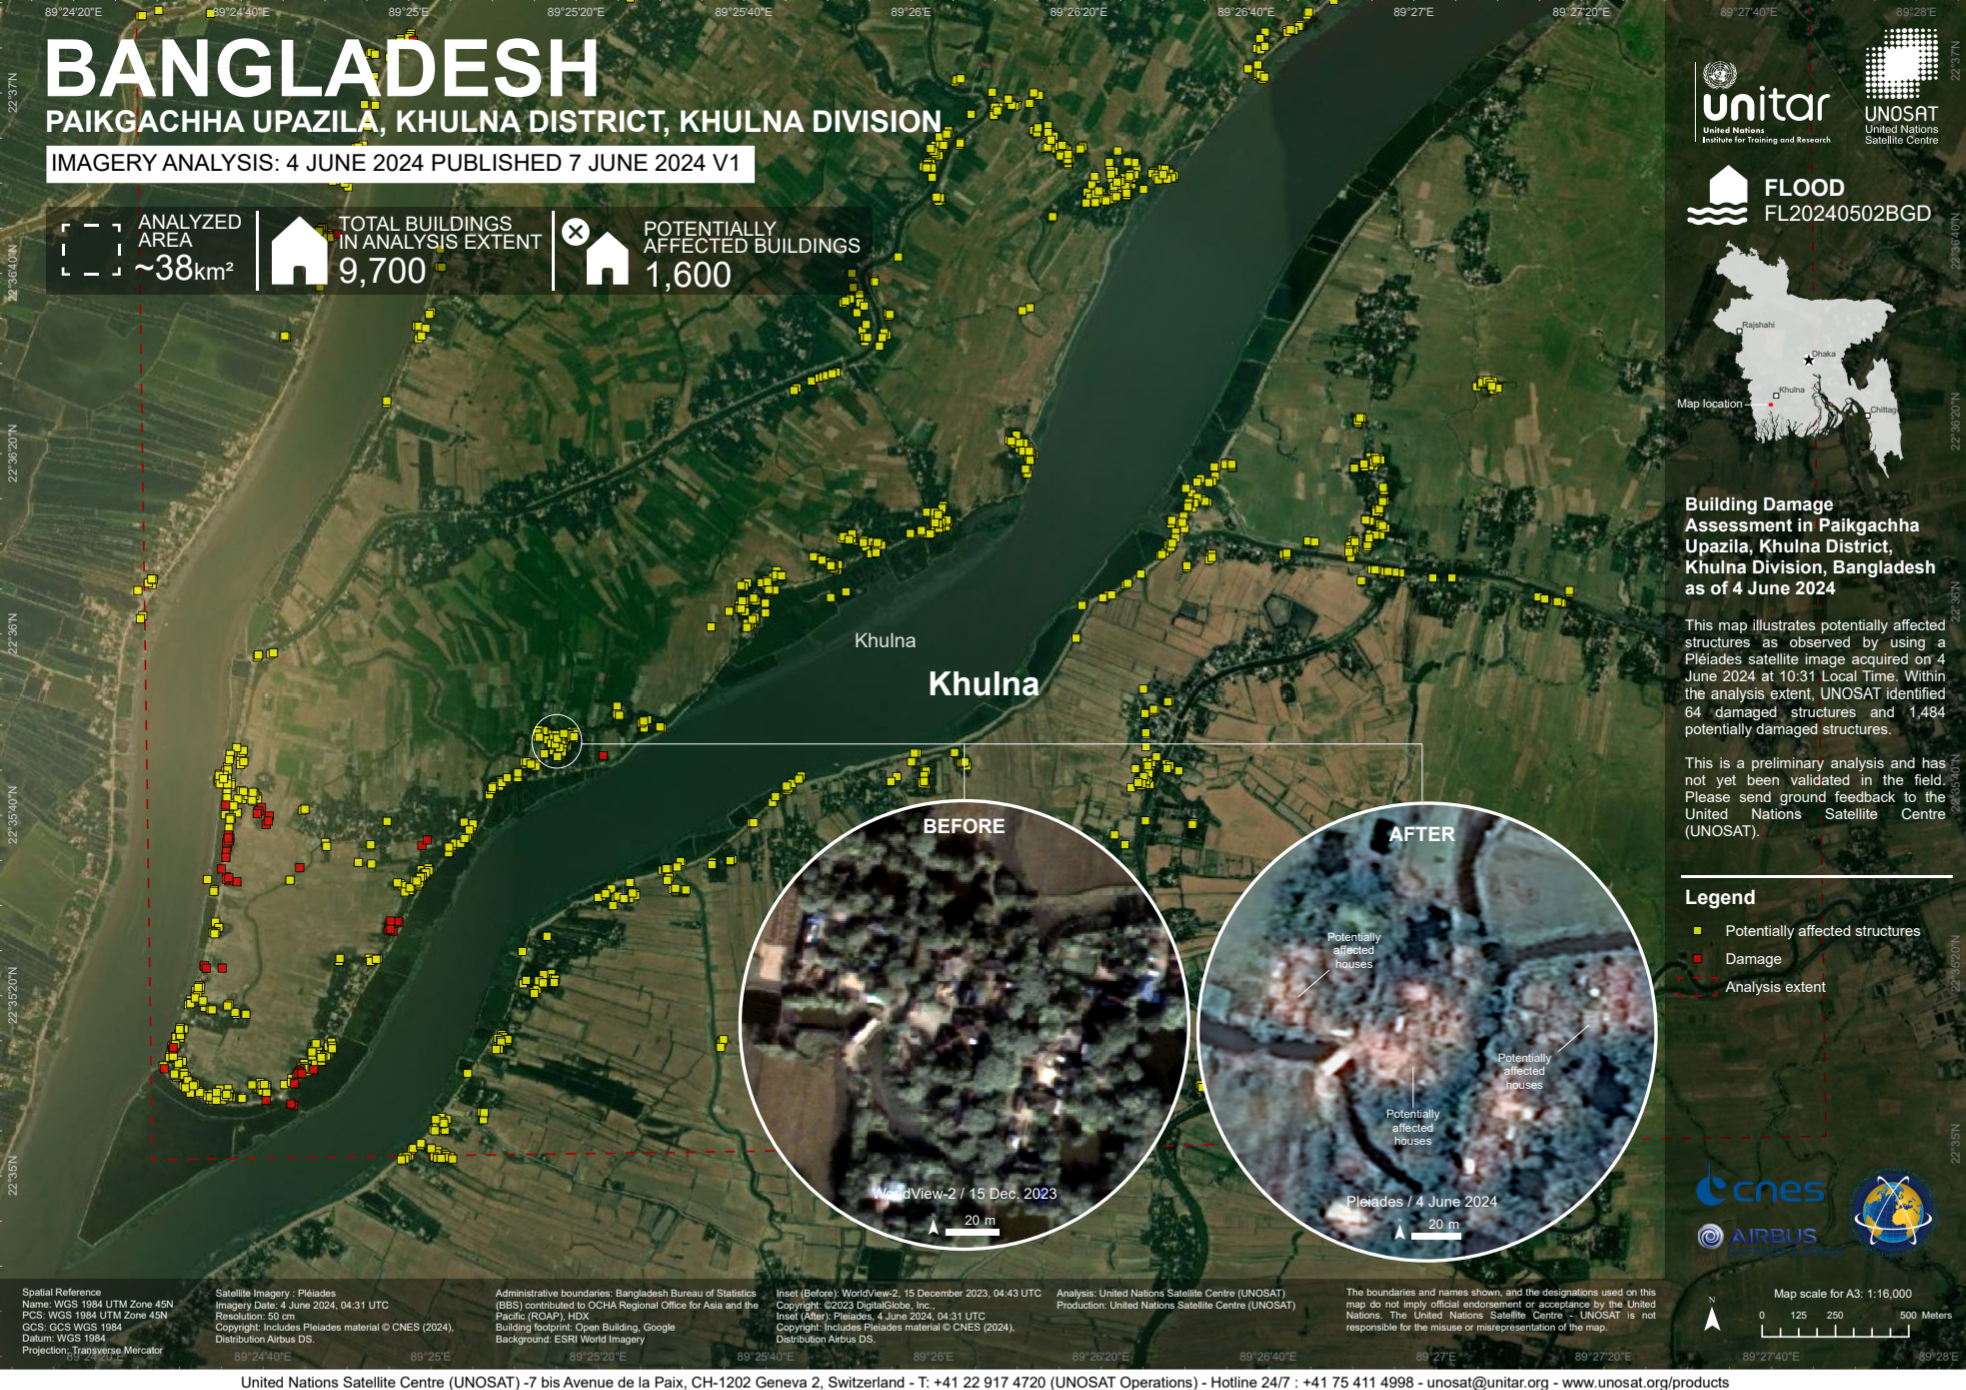
Fig. 56 Building Damage Assessment in Paikgachha Upazila, Khulna District, Khulna Division, Bangladesh as of 4 June 2024 (Source: Int’l Charter, UNOSAT)#
Spatial Digitisation Errors in QGIS#
The accuracy of geodata is crucial for spatial analysis. Positional errors are inevitable when data are manually digitised. The most common examples include undershooting and overshooting. When your coordinates do not connect as they should, and overshooting, when the lines go past where they should. Often these errors are not visible unless you zoom in quite a bit on the coordinates. Setting a fuzzy tolerance (snapping tolerance) is used to reduce undershoots and overshoots. The snapping tolerance is the minimum tolerated distance between nodes, lines and/or vertices.
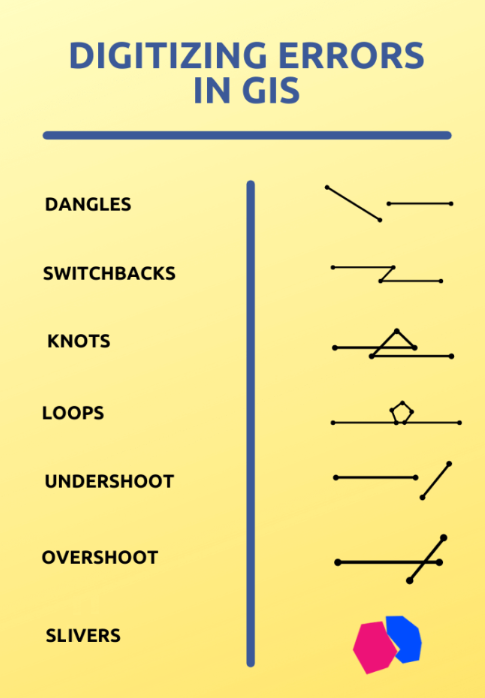
Fig. 57 Digitising Errors in QGIS. Source: SpatialPost.#