Picture upload and management: AILAS Project #
This documentation provides instructions on how to upload and manage street-level images that are captured in the framework of the AILAS project.
Background: Panoramax #
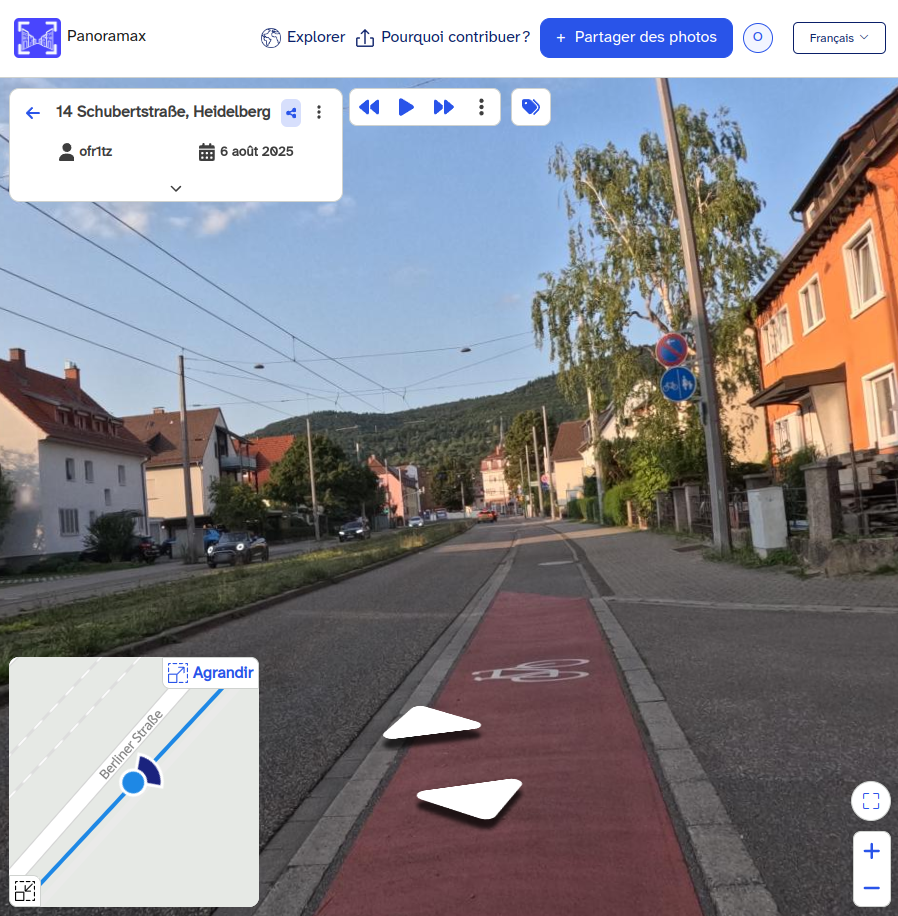
Fig. 105 Screenshot of a street level image displayed on Panoramax#
All pictures captured in the framework of the AILAS project are expected to be uploaded to a private instance of the street-level imagery platform Panoramax. This ensures that the imagery is easily available to the concerned stakeholders for the further usage in the project (labelling of training data, modelling), while being protected against access from unauthorized users.
What is Panoramax? #
Panoramax is an open, federated platform for sharing and viewing street-level imagery. Like Google Street View and Mapillary, it allows users to explore places through photos taken along streets and paths. But unlike commercial platforms, Panoramax is built as a decentralized and open ecosystem: imagery is hosted on independent servers (run by institutions, cities, or communities) rather than a single company, and access is governed by open standards. The entire stack of Panoramax software is open source.
This means that data ownership stays with the contributors and hosting institutions, and imagery can be more easily integrated into local projects, research, or public services. Panoramax emphasizes openness, transparency, and sovereignty of street-level data.
Features #
🌍 Core Features #
Street-level imagery viewer – explore panoramic or directional images along roads, paths, and places.
Open & federated hosting – imagery is stored on independent servers operated by different organizations (municipalities, research centers, NGOs, etc.).
Open standards (STAC, OGC) – ensures interoperability with mapping platforms, GIS tools, and data portals.
Contributions from multiple sources – imagery can come from institutions, community projects, or individuals.
Integration into mapping workflows – imagery can be linked with OpenStreetMap or other geospatial datasets.
🔍 Privacy & Processing #
Automatic face and license plate blurring – built-in anonymization before imagery is published.
Object detections – AI models can detect relevant features (e.g., traffic signs) within the imagery.
Custom detection models – operators can run their own detection pipelines for specific use cases.
Metadata enrichment – detected objects can be stored as data linked to the images, making the imagery searchable and analyzable.
⚙️ Platform & Ecosystem #
API access – developers can query and use imagery programmatically.
Web-based viewer – lightweight, embeddable viewer for public portals or project websites.
Community-driven – open-source software stack, enabling transparency and extensibility.
Long-term data ownership – institutions keep control over where and how their imagery is stored and shared.
Data privacy and security #
Panoramax prevents the identification of people in the imagery by blurring faces and license plates. This happens automatically on image upload and before the images are published. Users can report any further issues with an image through the platform. This will cause the image to be hidden from public view until intervention from the owner of the image.
While one of the main features of Panoramax is its global public meta-catalogue that makes images from all federated instances findable, we deliberately choose not to join the federation with the Panoramax instance of the AILAS project. This means that images uploaded to our instance cannot be accessed through the global API.
The Panoramax instance used by the AILAS project has a default setting for uploaded images to be visible only to logged in users of the website. Users cannot register accounts to the Panoramax instance themselves, but must be created by the administrators. This means, that the uploaded images and image sequences will not be visible to the general public.
Picture upload #
1. Remove the SD card from the camera. #
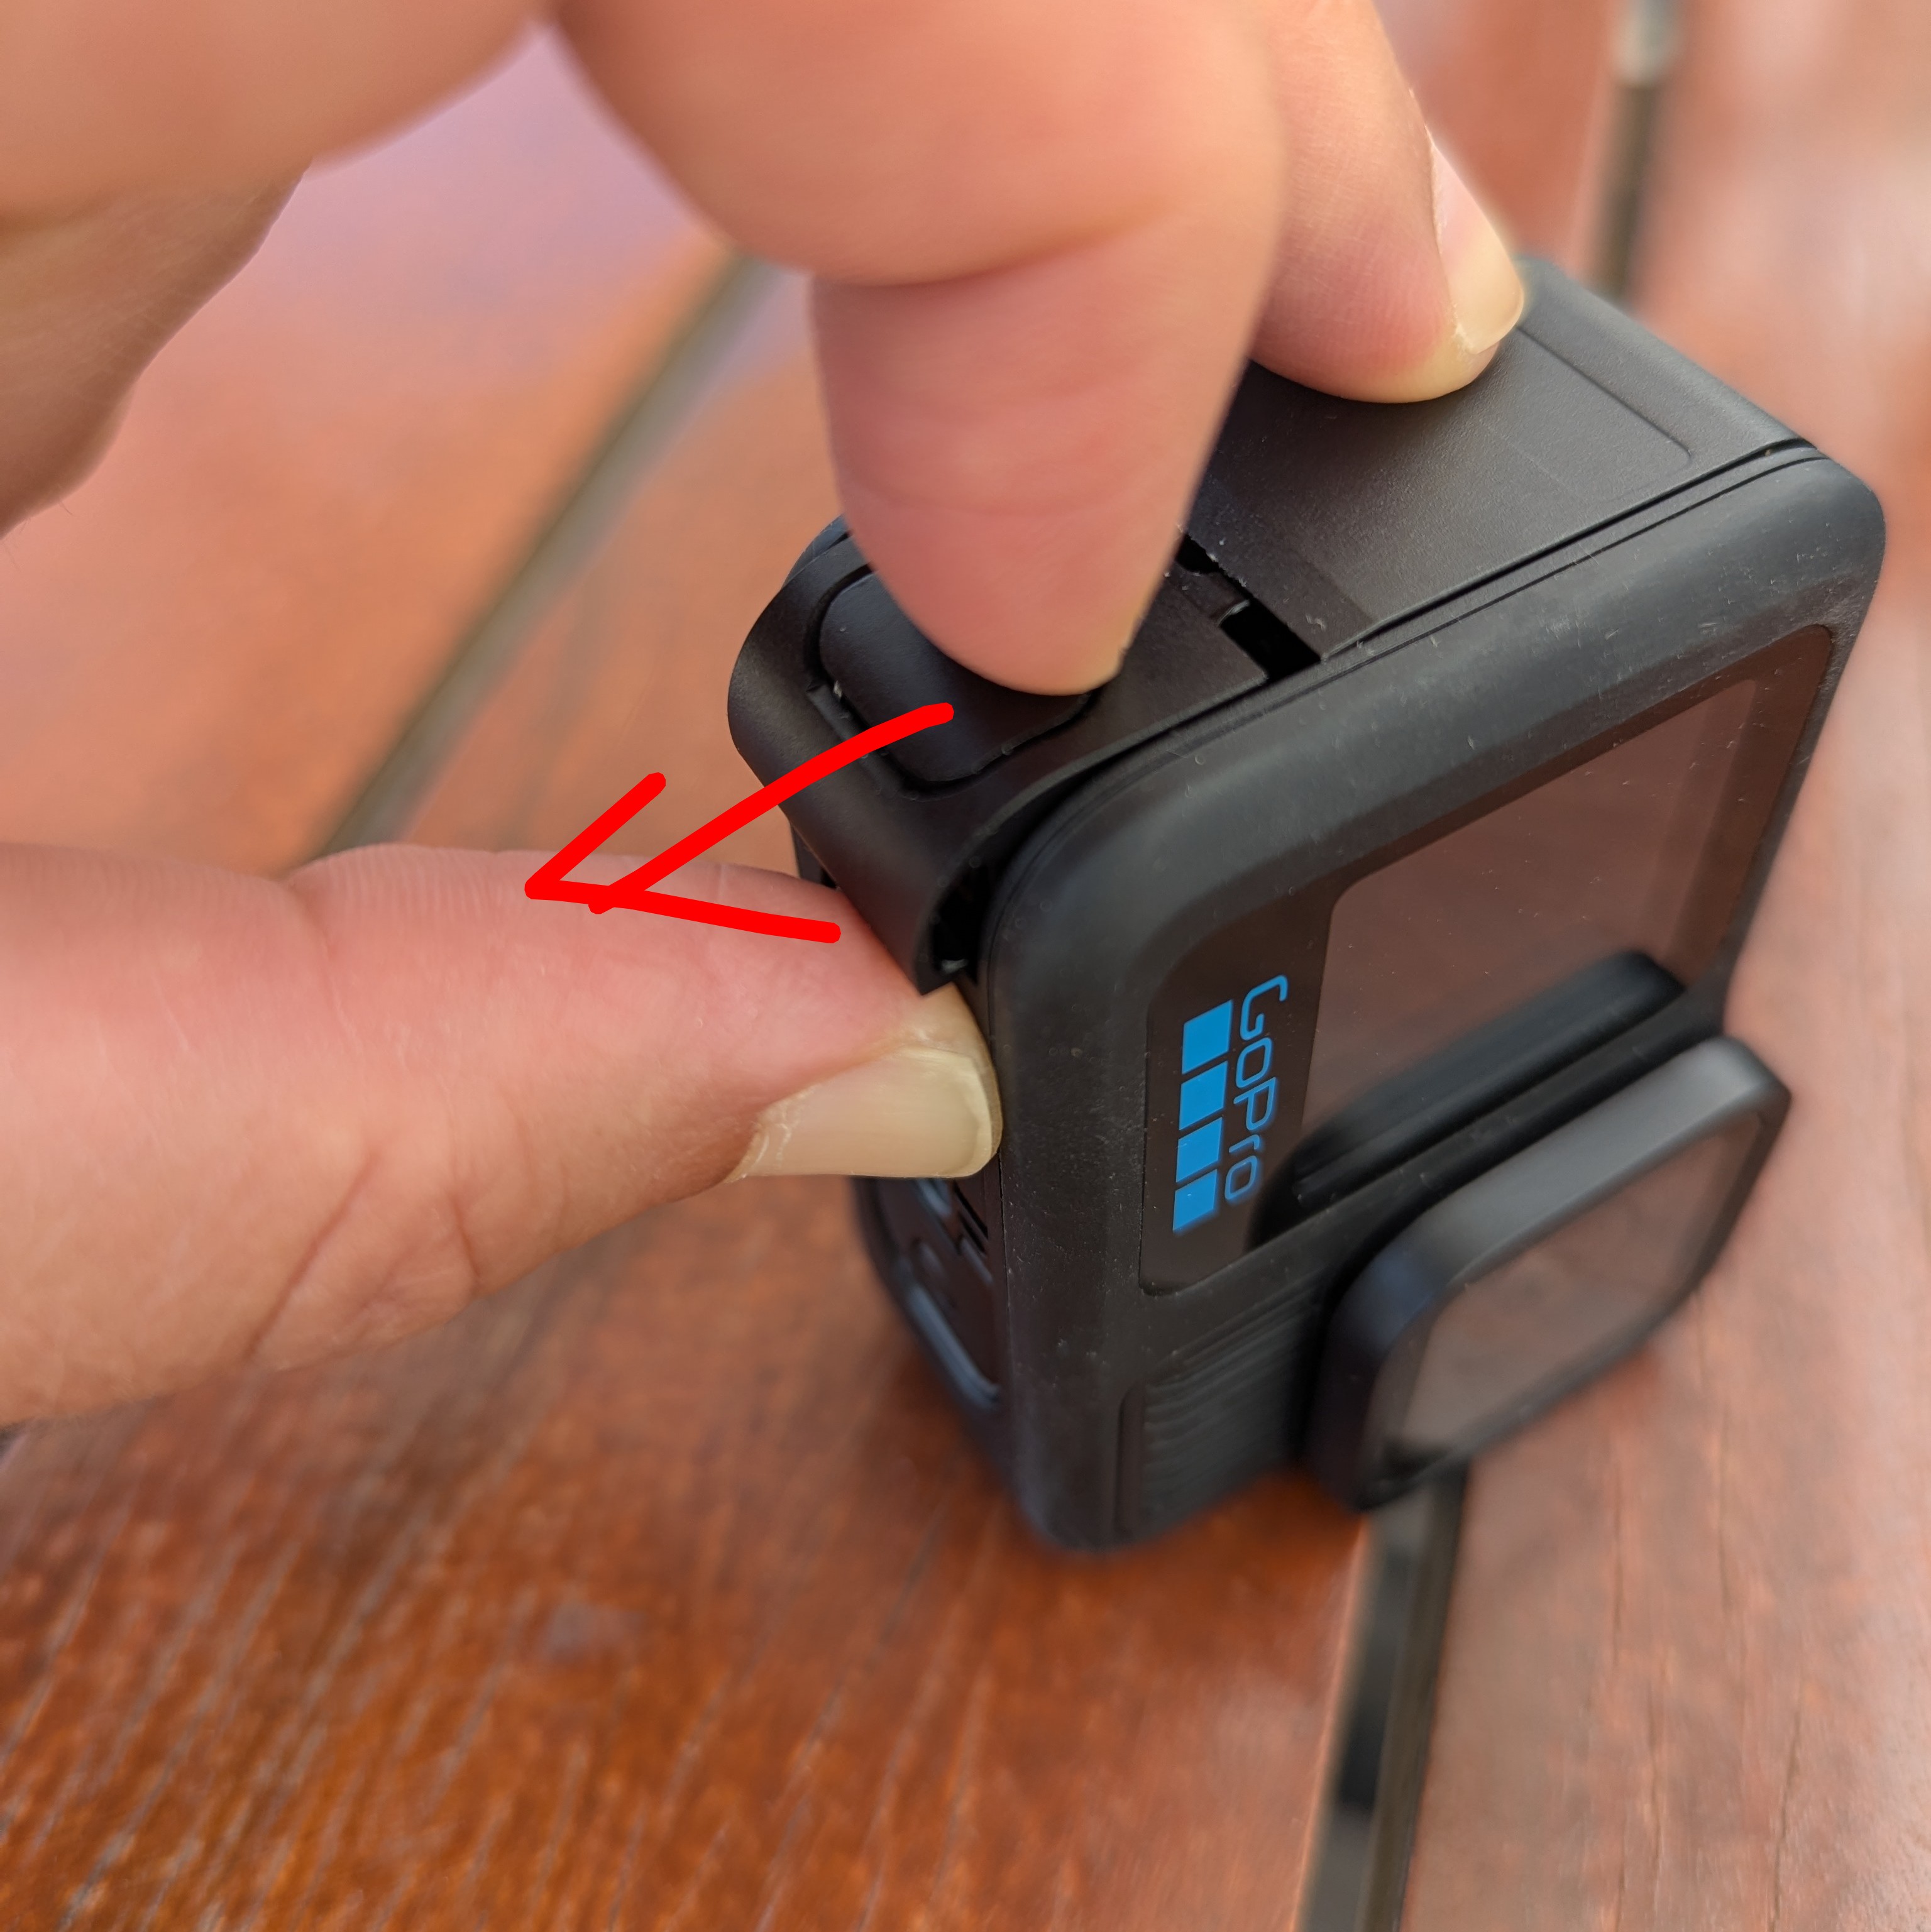
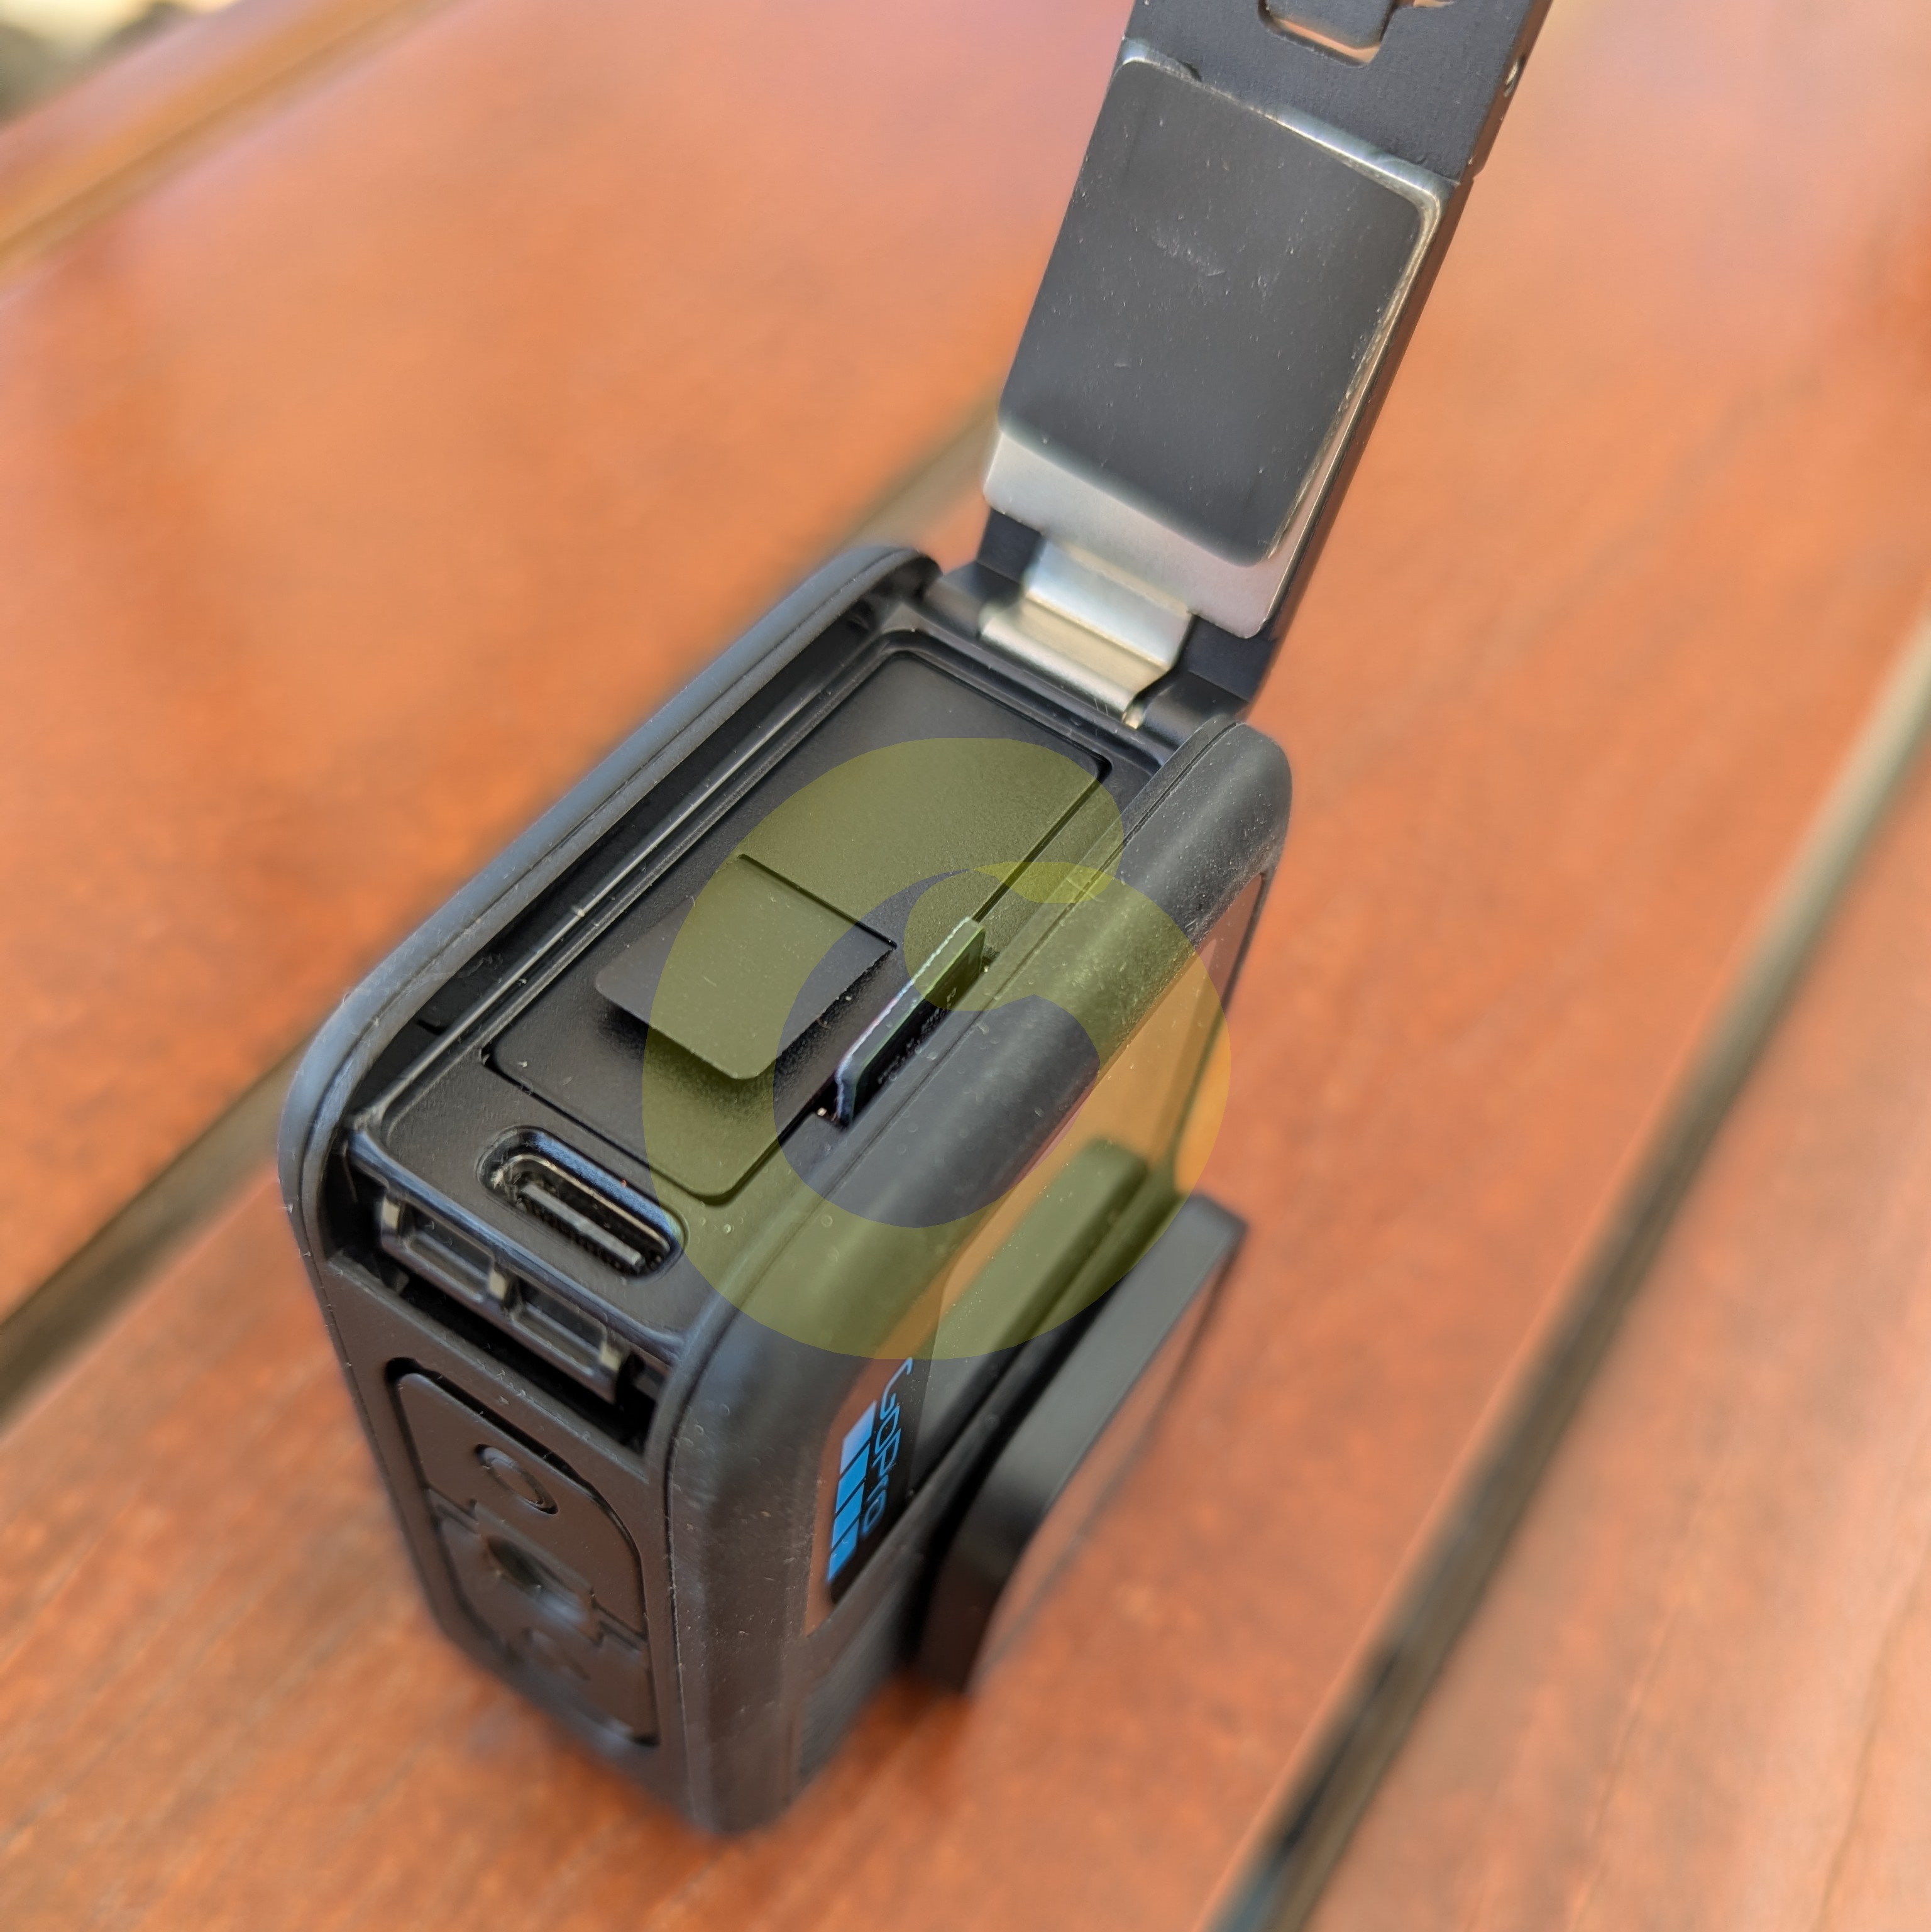
2. Insert into card reader and connect to computer. #
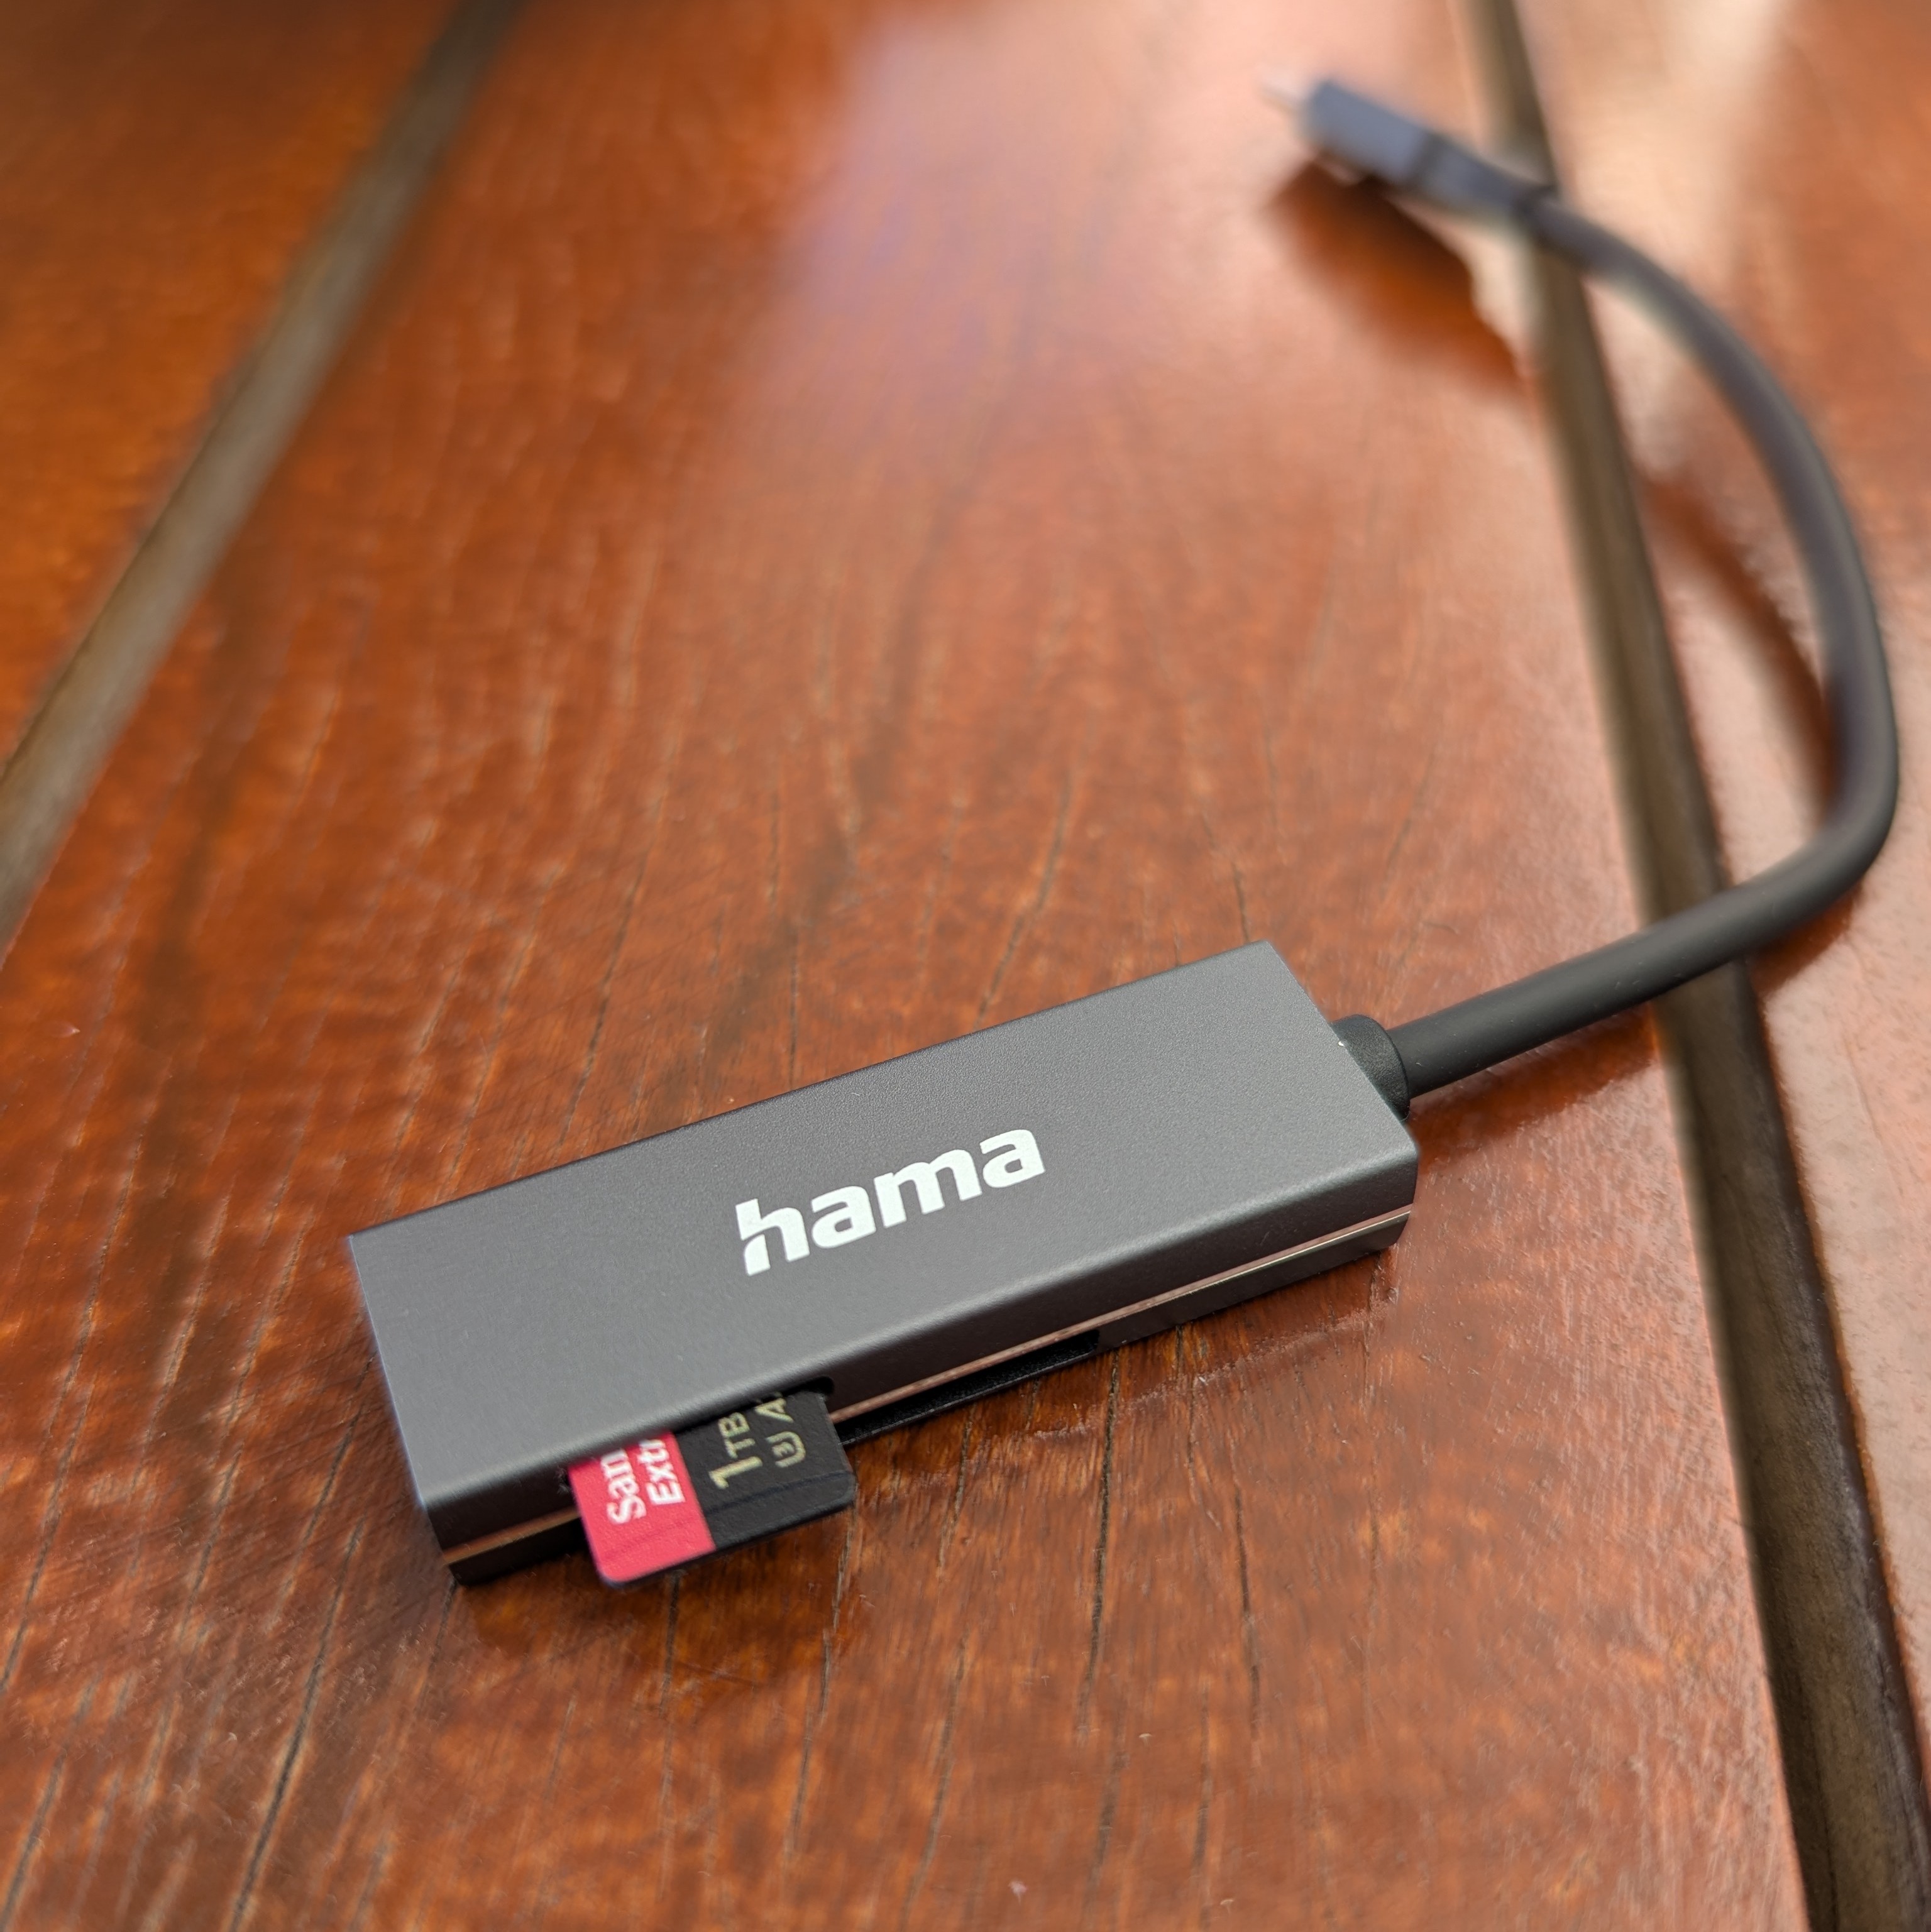
Fig. 108 Insert the SD card into the card reader#
With the SD card inserted, connect the card reader to a computer.
3. Sign in to Panoramax #
Open the AILAS project’s Panoramax website and click “Log in” on the right side of the top navigation bar.
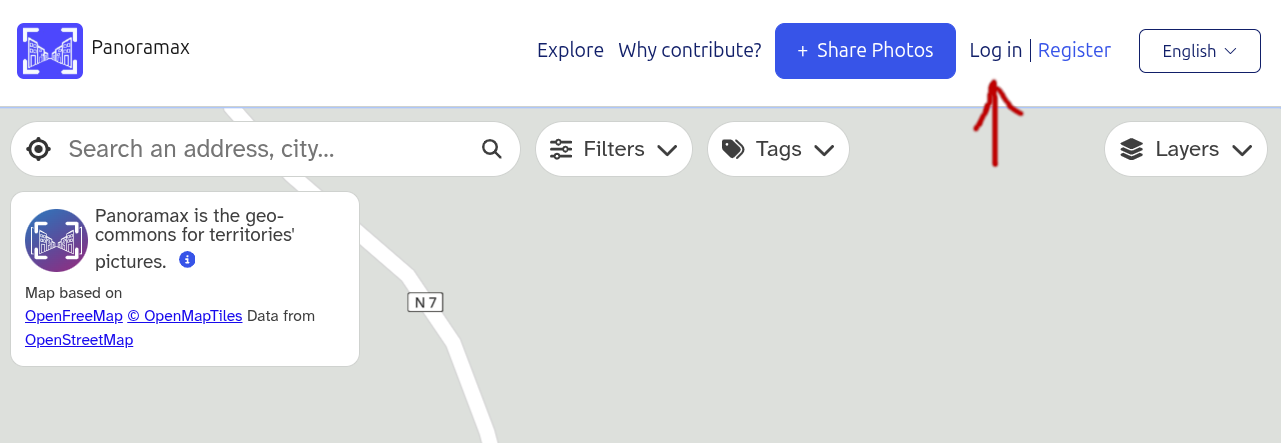
Fig. 109 Log in to Panoramax#
Enter your e-mail and your password, and click “Sign in”.
If this is your first time logging in, you will use an initial password provided to you. You will need to change the password immediately after logging in.
Other Panoramax instances
For the AILAS project, images are expected to be uploaded to a specific instance of Panoramax. Access to the images on this instance is restricted to selected humanitarian partners. If you do not have access to this instance, but want to share your street-level imagery in the public, check out available public instances at https://panoramax.fr.
4. Upload images #
Click the big blue “Share Photos” button in the top navigation bar.
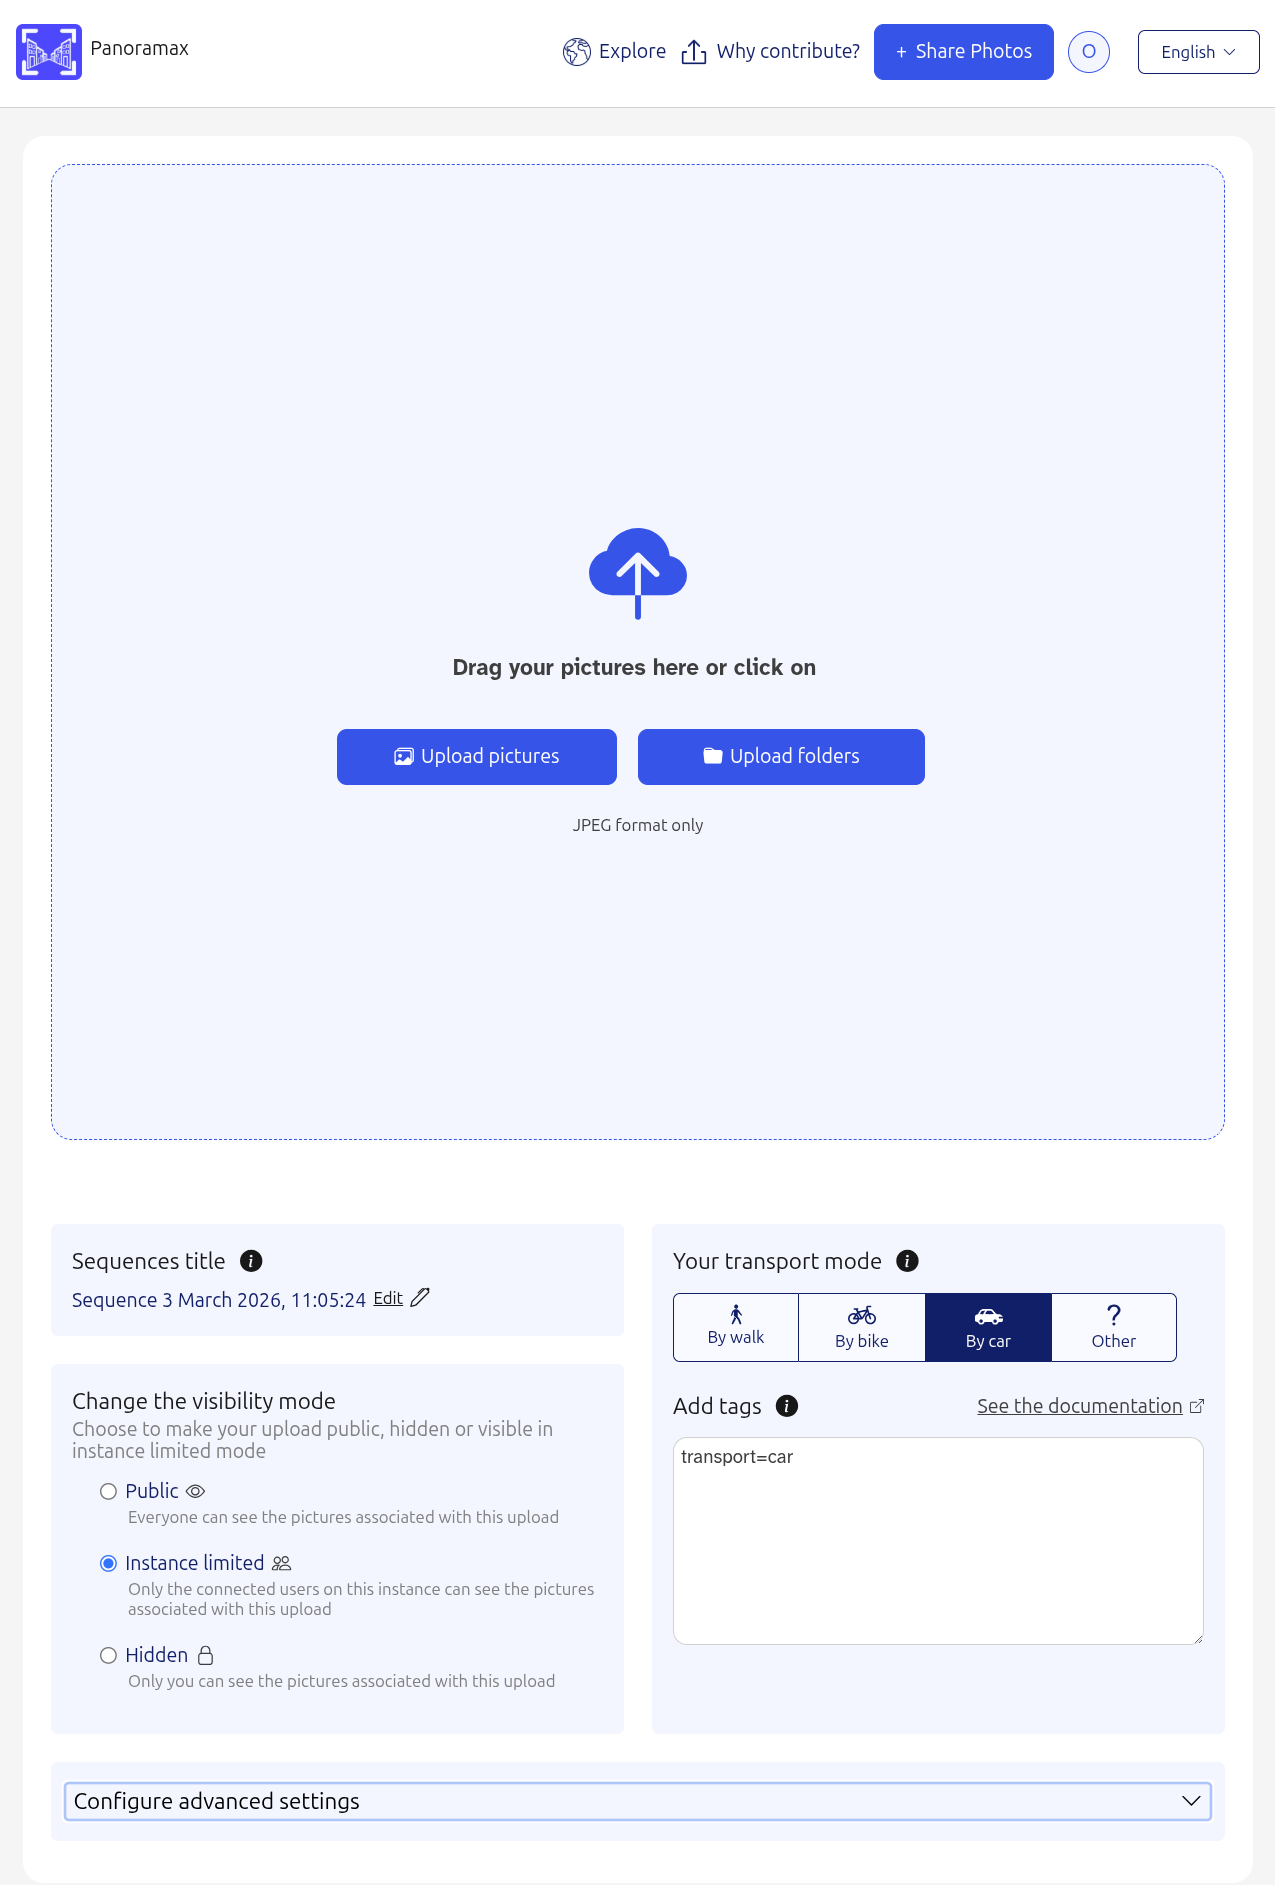
Fig. 110 Upload images#
Make sure that visibility mode is set to “Instance limited” (default)
Indicate the transport mode: If the images have been captured by a camera installed in a car, choose “By car”.
Do not change the advanced settings.
Click “Upload pictures”. A file browser will open. Select and open all the images on the SD card in the folder
/DCIM/100GOPRO. It can take some seconds before the upload starts if you have selected a large number of images.Keep the browser window open until the upload is completed.
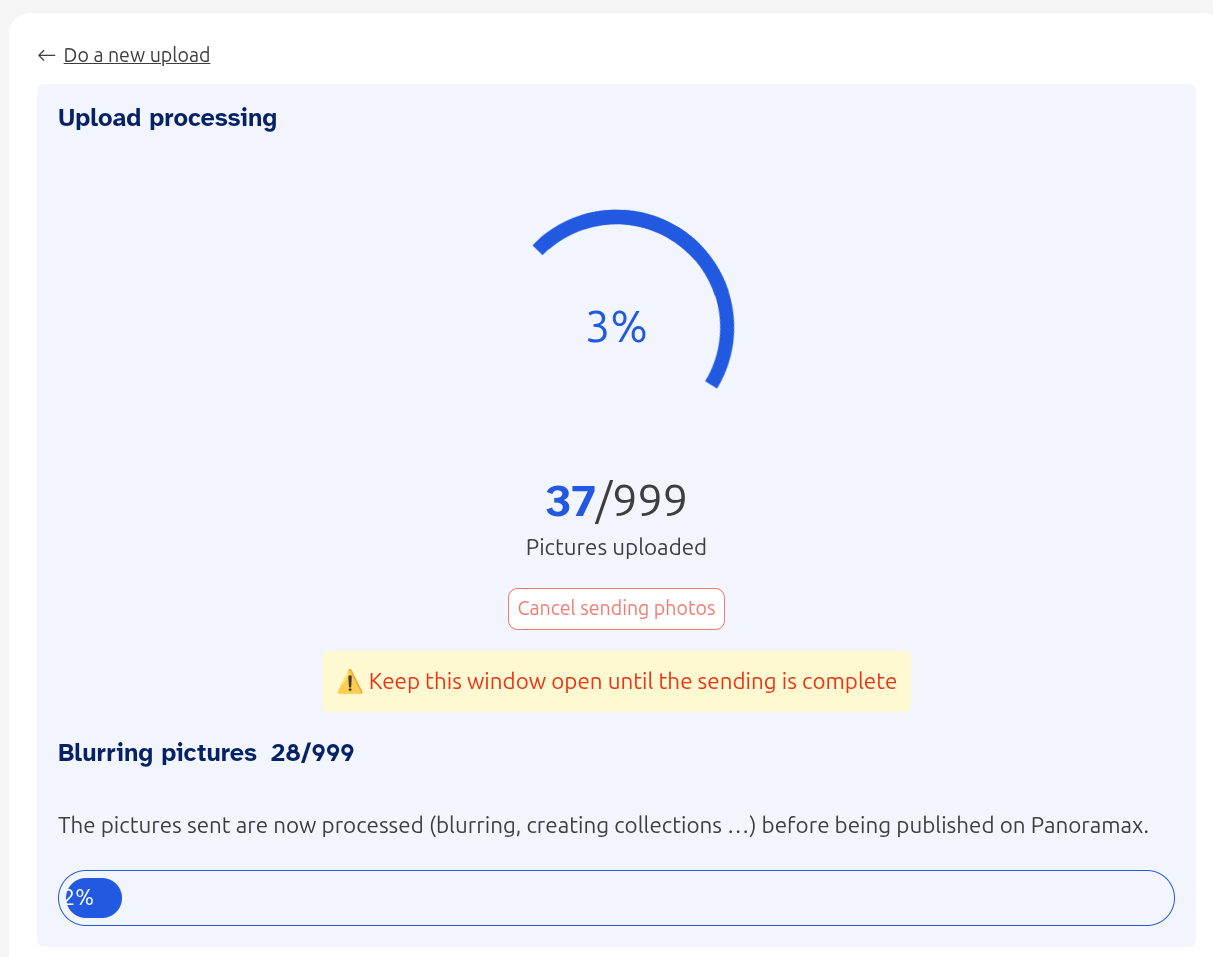
Fig. 111 Keep the upload window open until the upload is completed#
When the upload is completed, you may encounter some error messages. Images are rejected when they lack location data, or when they are too close to the previous image in time and space. Usually, this is nothing to worry about. However, if a large amount of images could not be uploaded due to missing location data, try to turn on the camera earlier before going on the next trip, to make sure that the GPS is ready when you start.
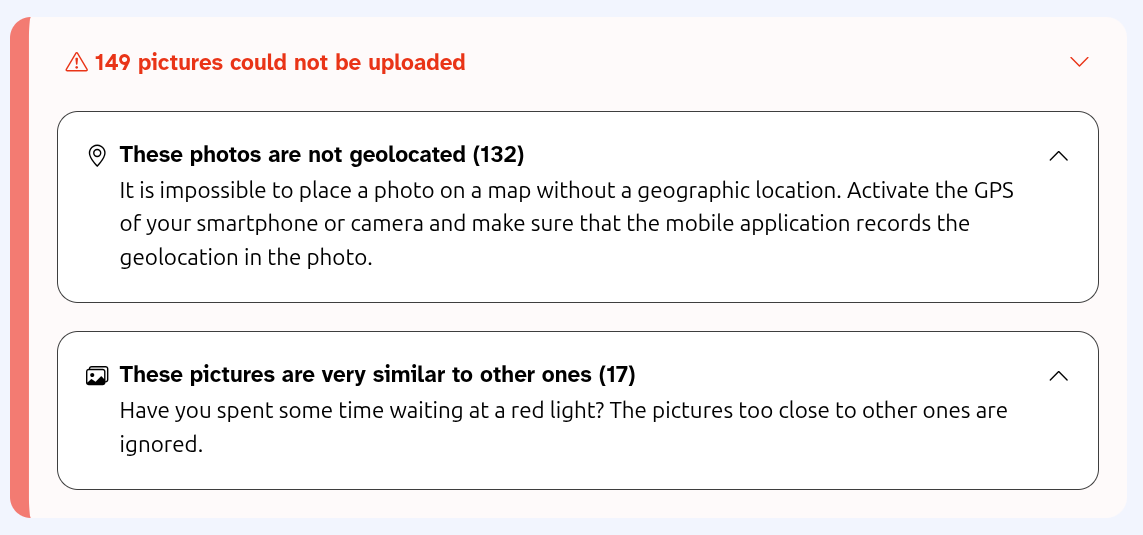
Fig. 112 Upload error messages#
Dealing with multiple image folders
If you captured more than a thousand images, the images are saved in several subfolders of DCIM called 100GOPRO, 101GOPRO, etc. Repeat steps 1 to 6 of this section for all the subfolders.
5. Delete images #
Once you have successfully uploaded the images, delete them from the SD card.
6. Re-insert SD card into camera #
Safely remove the SD card reader from your computer, and re-insert the card into the camera.
Picture exploration on Panoramax #
See your own uploaded sequences and pictures #
Click on your account icon in the Panoramax top navigation bar and choose “My Photos”. A page listing all your uploaded image sequences will open.

Fig. 113 My Photos page#
The sequences are listed with their names, number of photos, shooting and upload date, covered distance, and the visibility status. You can search your image sequences by area (the current view in the map on the left side of the page), or sort and filter by date.
To view all photos in one specific sequence, click one of the sequences. This will open the sequence page.
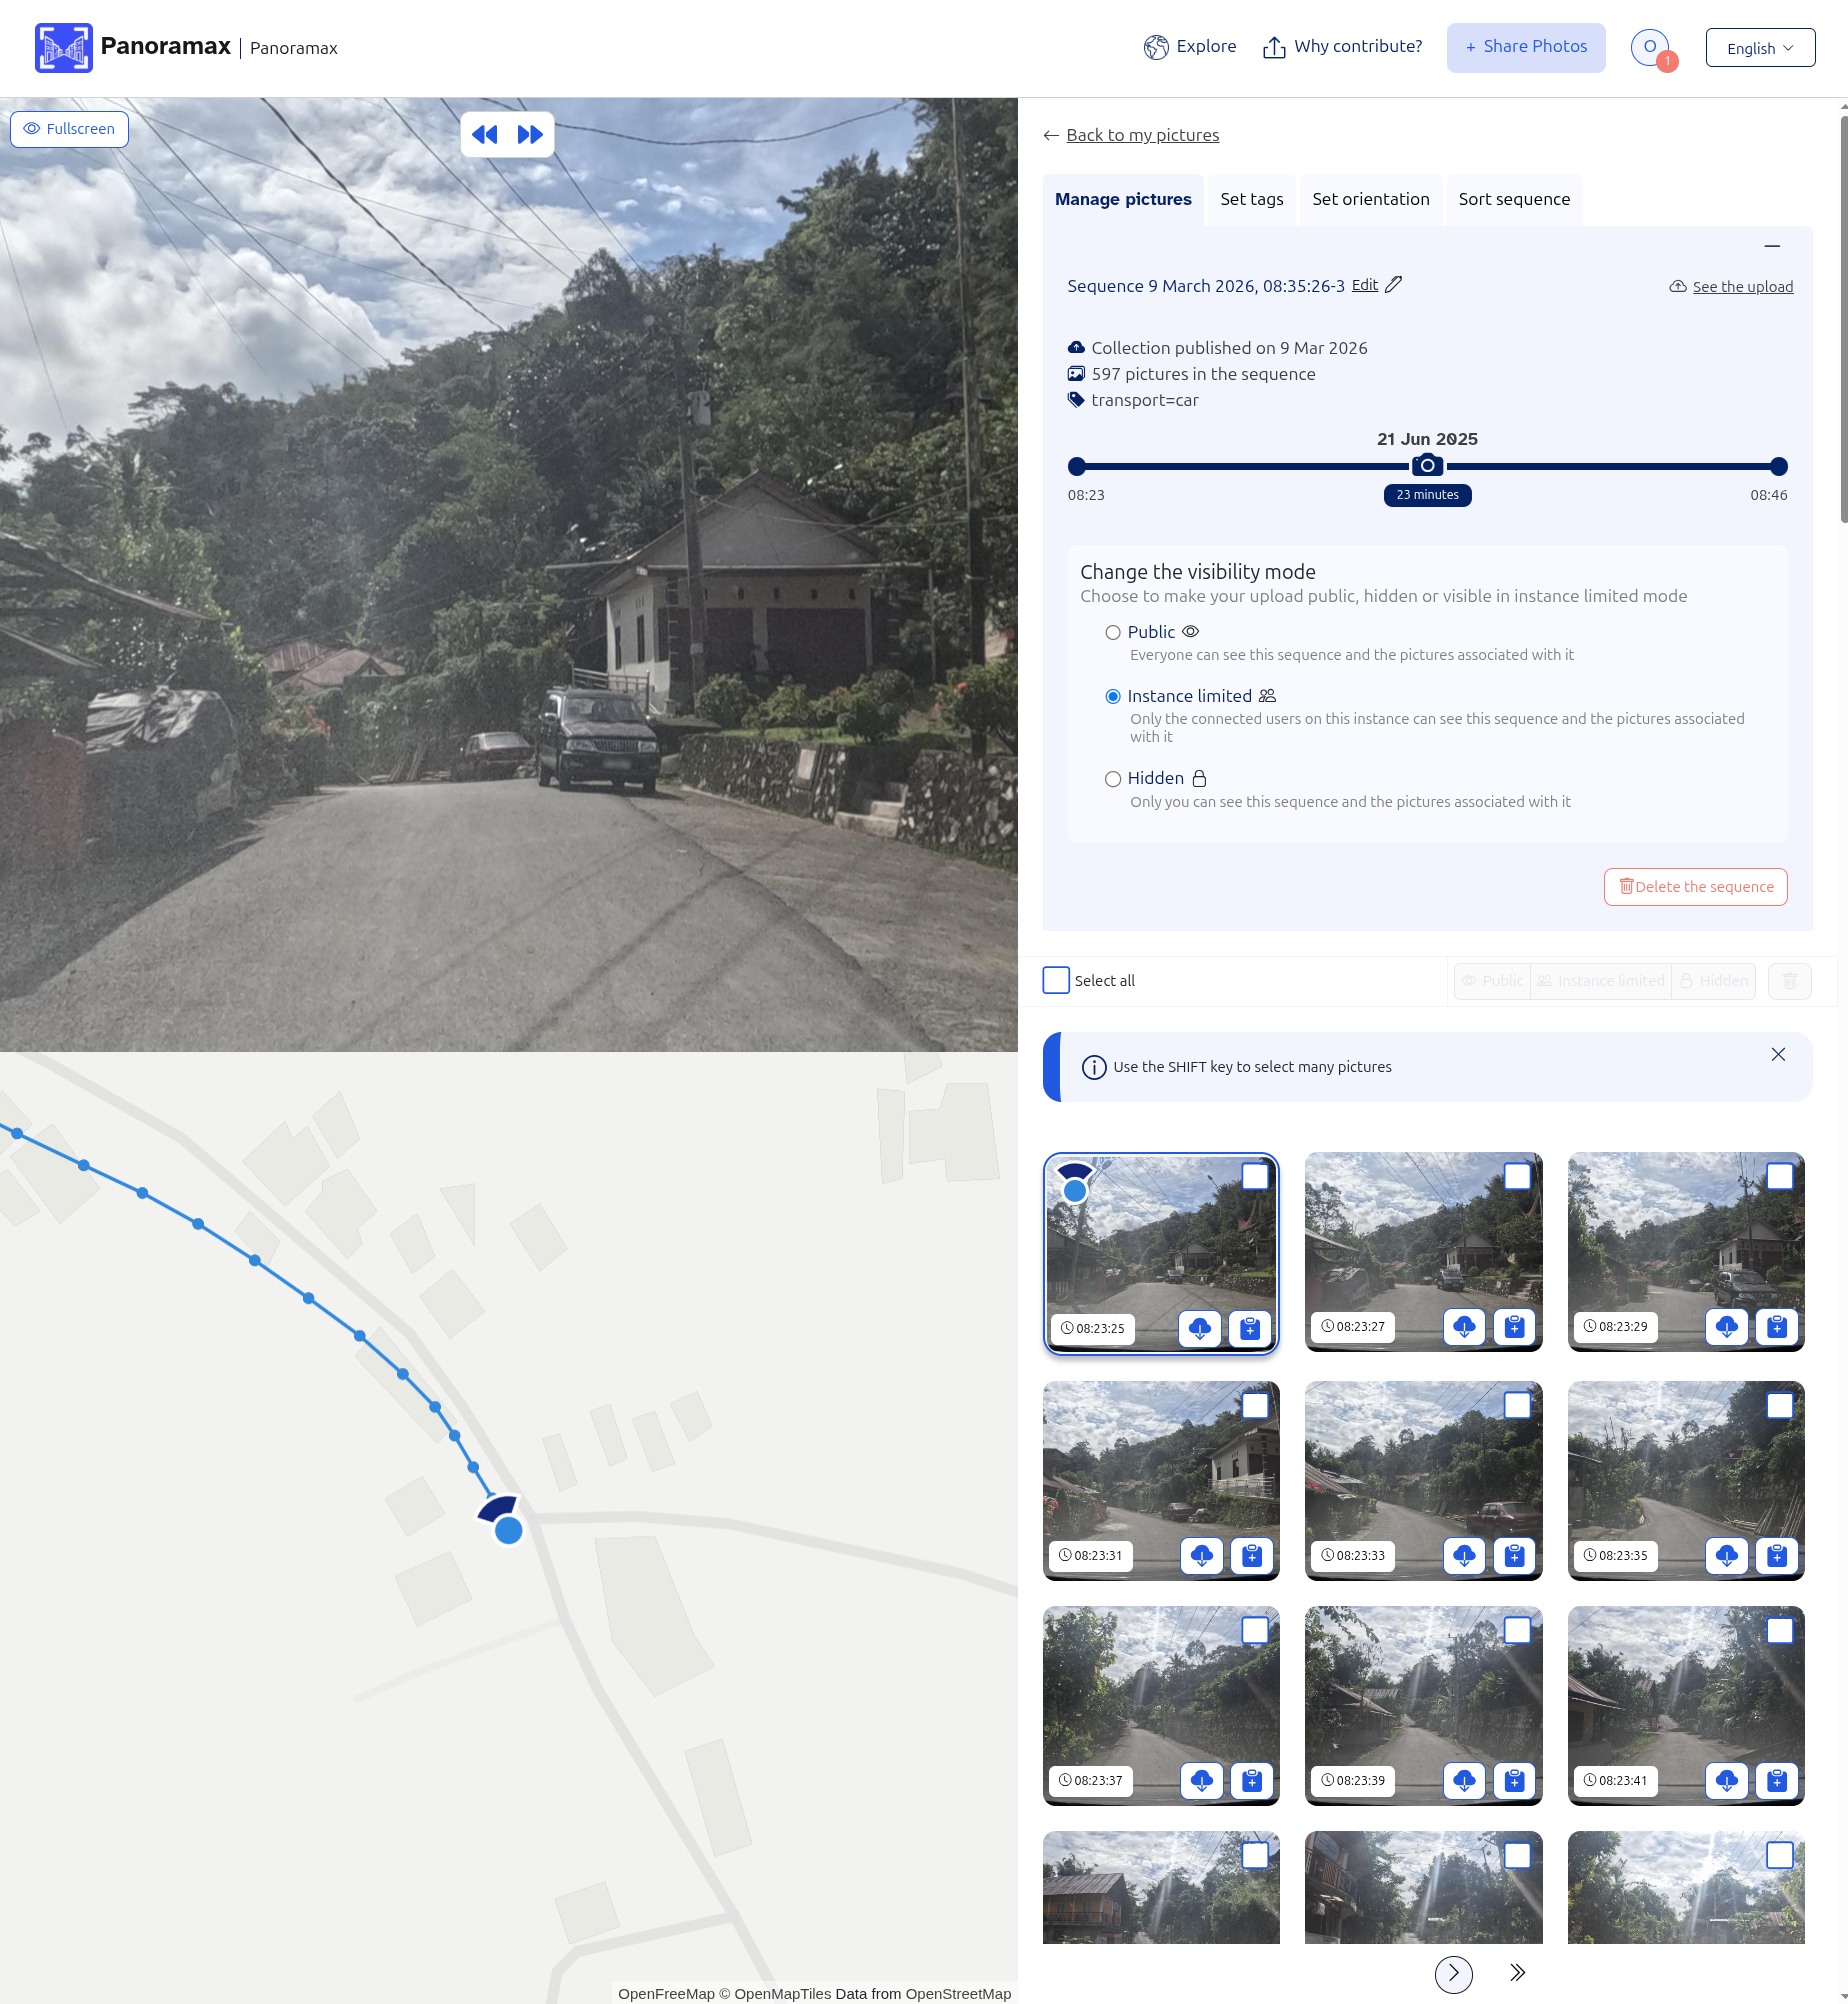
Fig. 114 Sequence page#
The sequence page displays thumbnails of all photos in a sequence. You can also edit e.g. the name of the sequence, or hide individual photos. Do not, however, change the visibility mode of the sequence.
By clicking on the “Fullscreen” button, you will get to the “Explore” map while focusing on the currently selected sequence and image.
Explore all pictures on Panoramax #
Click “Explore” in the top navigation bar to open an interactive world map to explore all available images. Move and zoom the map to find images, or use the search bar in the top left corner to find addresses, cities, etc. on the map.
Click on one of the image markers on the map to open an image.
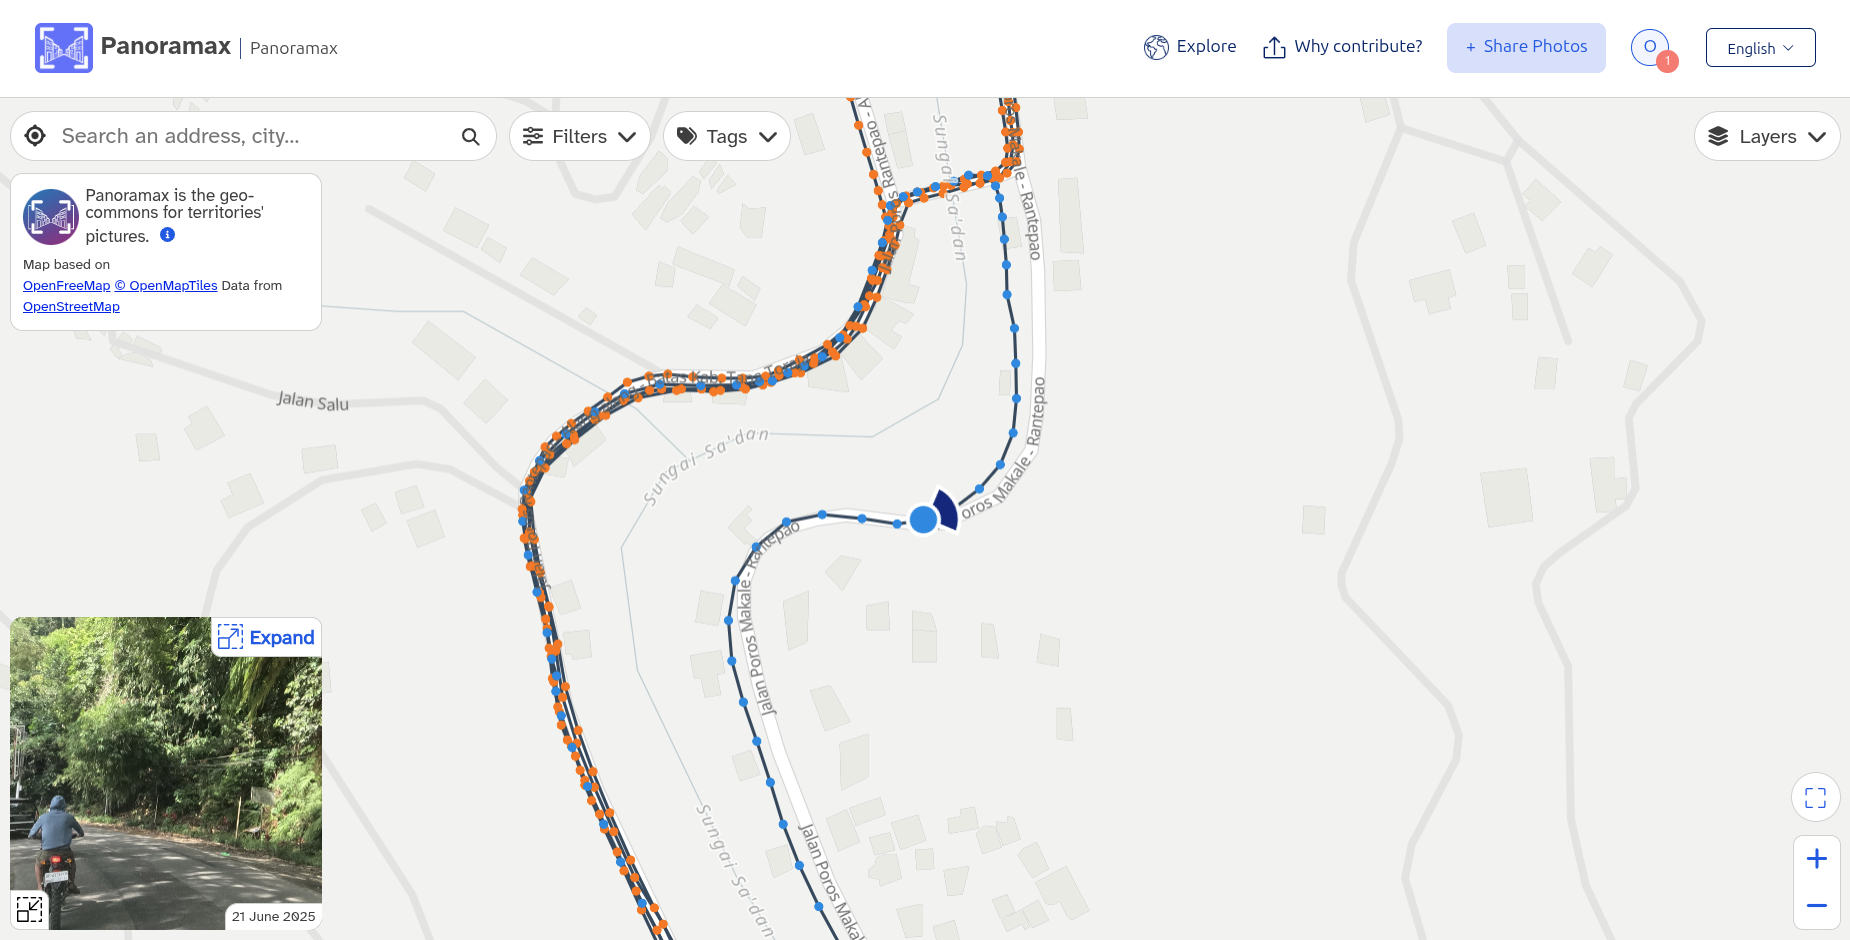
Fig. 115 Explore: Map expanded#
You can click “Expand” in the bottom left inlet to toggle between displaying the image or the map in the main view. While displaying the image in the main view, the top left box provides metadata to the photo. This box has a “Report” button to report any issues with the photo, and both an “iD” and a “JOSM” button to open the current map in the respective OpenStreetMap editor.
Use the navigation arrows on the image to move between images, or press the “▶” button to move through an entire sequence.
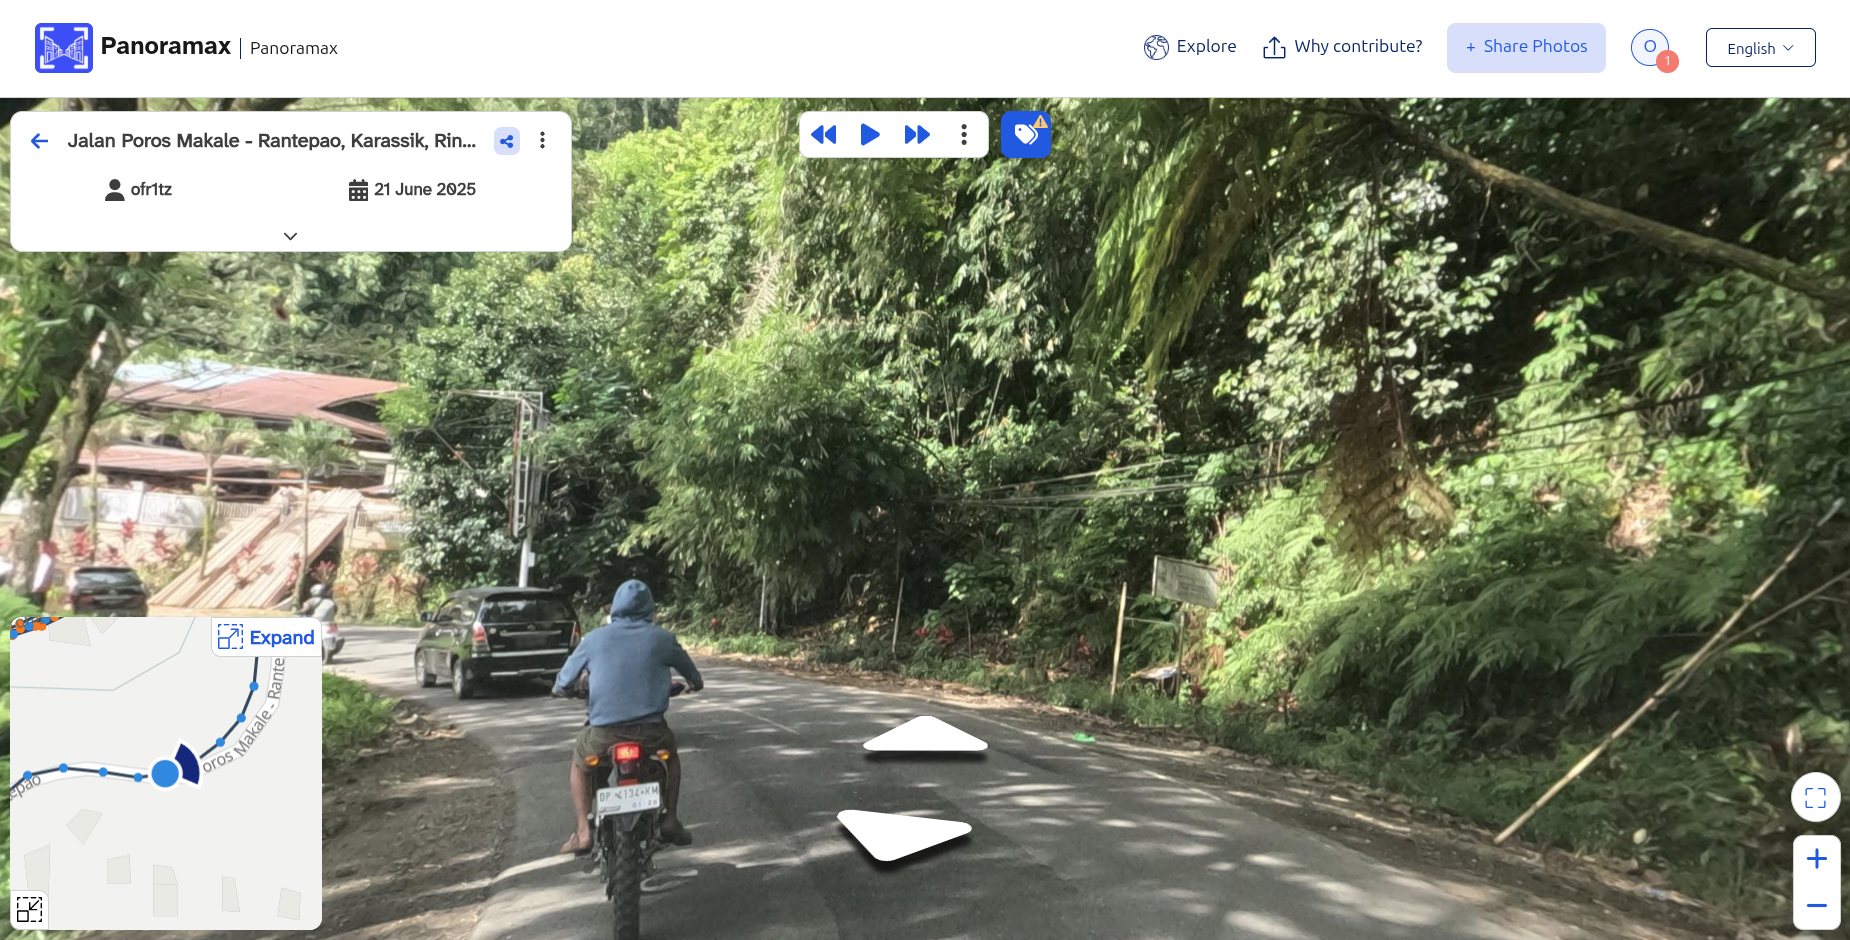
Fig. 116 Explore: Image expanded#