2.3. Geodata management #
In this chapter, we will have a closer look at how to store geodata on your computer to work in QGIS or other GIS applications. Since vector data is the primary geodata type you will work with at the beginning of your GIS career, we will focus on vector geodata. We will learn how to set up a coherent folder structure for your GIS-data and projects and how to name geodata correctly.
2.3.1. Fundamentals of Geodata Management #
Working with geodata is not like working with data in programs such as Microsoft Excel or Word. Whenever you load an image in a Word file, the file will contain the image. If you delete the image on your computer, the Word file will still contain a copy of the image.
This is not the case in QGIS! When you load geodata into QGIS, the system only establishes a link to the location where the data is stored on your computer. This means your QGIS project does not contain the geodata, it only links to it. If you load data in your QGIS project and you change the location of the data or delete it, the data is no longer available in your QGIS project and you will get an error when you open it.
Because you are working directly with the source data, rather than a copy, whenever you edit data in QGIS the changes replace the source data and can not be reversed. If you plan to make changes to your data, you should make a copy of it first so that you always have a ‘clean’ copy you can go back to.
2.3.1.1. Standard folder structure #
The single most important geodata management practice is to use a standardised folder structure that contains all parts of the QGIS project.
The paths from a QGIS project to the geodata are by default relative. This means when the data and the project are in a fixed folder structure, you can move the whole structure without impacting the QGIS project or the paths to the data. The version of a standardized folder structure that is used for all exercises in this training is explained below. A template of the folder structure can be downloaded here.
A standard folder structure has two principal advantages:
If we share the whole project folder, we can expect the project to run without problems on a different computer
The folder structure supports the proper organisation of project data and helps ensure the QGIS project will work as intended
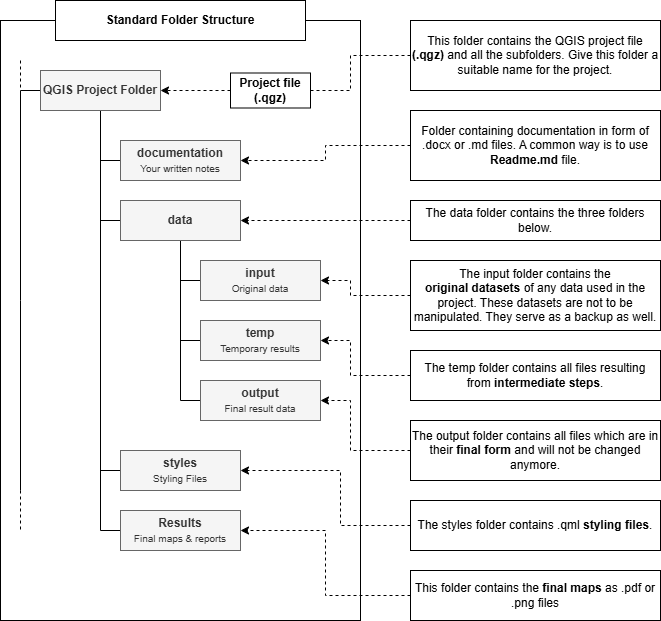
Fig. 2.23 Standard folder structure. Source: HeiGIT#
2.3.1.2. Naming Geodata #
Naming your data correctly ensures that you can identify the layers and your computer does not run into any issues when working with your data files. The name of your files themselves need to be clear, meaning that you or others can identify what the data shows, where the data comes from, and to what time it refers. In QGIS, you should name your layers so you can identify the content, as well as what you have done with the layer. For example, if you have clipped a street layer of New York, do not name the layer “clipped”, give it a name such as “streets_NYC_clipped”.
There are some basic principles when it comes to naming geodata that you produce or manipulate:
Do not use special characters like
!,?,/or-.Do not use blank spaces, use underscores
_Give layers meaningful names so that you can understand what they represent, even if they are a temporary/intermediate step in a workflow.
Below you can see an example of a workflow to process an admin boundary dataset (adm0). The purpose of the intermediate steps is not clear because the layer names are not meaningful.
adm0 >> adm0_temp >> adm0_temp2 >> adm0_temp3 >> facilities_final
A good naming system for layers is shown below. In this workflow, it is clear what processing was performed at each step (reproject, clip layer, join with another layer, final result).
In this way, other people can understand what purpose different layers serve and whether they are needed in the final project.
adm0 >> adm0_projUTM >> adm0_projUTM_clipUrban >> adm0_projUTM_clipUrban_intersectFacilities >> facilities_processed
2.3.1.3. Documentation #
Documentation is an important step when working with geodata or performing analyses. It ensures clarity, reproducibility, and enables collaboration. Spatial data analysis often involves complex processes, data cleaning, data transformations, and specific data sources. Without proper documentation, it becomes difficult for yourself and others to understand, replicate, or build upon your work. Documentation helps organise the purpose, the methods or tools, the data inputs and outputs, as well as the assumptions and limitations. In general, good documentation allows GIS-practitioners to reproduce the analysis steps to get the exact same result. In collaborative work, good documentation serves as a roadmap and is essential when working on GIS-projects. In humanitarian work, and in decision-making processes, good documentation is essential as it helps inform decision making which enables humanitarian teams to allocate resources.
You can document your projects using markdown editors or just simply creating a word document. Make sure it is saved in the documentation subfolder in your project folder. There are no set rules to write a documentation, however, adhering to a logical structure can help writing and reading your documentation. It is also advisable to write the documentation while you are performing the analysis. QGIS offers a lot of options and settings while performing an analysis, and it can be easy to forget the parameters you have used for an analysis step.
Project overview:
Add the title and purpose of the project.
Add a brief summary of the analysis.
Data sources:
List of all the input datasets (with links if possible)
Coordinate system used
Notes on data quality or limitations
Software & Tools:
QGIS version
Plugins used
Workflow & Methodology:
Step-by-step process with screenshots or diagrams where helpful
Describe each processing step (these can be in bullet points)
Mention key parameters or decisions made
Make sure yourself and other persons can understand and replicate the analysis steps. Good documentation turns your QGIS project from a black box into a transparent, shareable, and professional piece of work.
2.3.2. Self-Assessment Questions #
Test your knowledge
Take a moment to test what you’ve learned in this chapter by answering the questions below:
Where are the layers loaded into a QGIS project saved? What implications does this have when moving or renaming files?
Answer
Layers loaded into a QGIS project are not embedded into the .qgz project file — they are linked via file paths to the original data sources.
This means that if you move, rename, or delete a source file after adding it to the project, QGIS will not be able to find it, and the layer will appear broken or missing.
To avoid this, maintain a consistent folder structure and avoid changing file locations once the project is set up — or update the file paths if you do.
When editing geodata in QGIS, why is it recommended to make a copy first?
Answer
Because QGIS edits the original data file directly, there is no built-in undo or automatic backup once changes are saved.
If you make a mistake during editing, you can’t easily revert it.
Creating a copy of the dataset before editing preserves the original data and gives you a fallback in case anything goes wrong.
What are two principal advantages of using a standardized folder structure for GIS projects and data?
Answer
Portability: If the entire project folder (including data subfolders) is moved to a new computer or drive, the QGIS project can still find its data as long as relative paths are used.
Organization & consistency: A clear, consistent structure helps avoid misplaced files, makes the project easier to navigate, and ensures others can understand and work with your project more easily.
Describe at least three good practices for naming geodata / layers.
Answer
Avoid special characters and spaces in file names — use underscores
_instead (e.g.,land_cover_2020.shp).Use descriptive names that indicate the content of the layer (e.g.,
population_density_europeinstead of justdata1).Indicate processing steps in the name if the layer has been modified (e.g.,
rivers_clipped,buildings_buffered_500m) to make your workflow transparent and reproducible.
If you move the entire project folder (with its subfolders and data) to a different computer, under what conditions will the QGIS project still work without broken paths?
Answer
The project will still work if:
all of the files used in the project are contained inside the project folder.
You do not use plugins or resources that are not available on the different computer
If any files were loaded using absolute paths (e.g., from a location outside the project folder), those paths will likely break after moving to a new machine.