Installing and running NetAScore#
Pre-requisites and Installation#
To run NetAScore on your machine using the ready-made Docker image, you need to have Docker installed. Before you start with the Tutorial, make sure Docker is running and that you have a stable Internet connection.
As an alternative, you may run NetAScore outside of Docker in Python. However, this requires to have a PostgreSQL database set up and running, as well as having several commandline utilities and python packages installed. To follow this approach without using Docker, please find further instructions at the respective NetAScore wiki page.
1. Get the resources#
After you installed Docker, you need to download the docker-compose.yml as raw file from the examples in plus-mobilitylab/netascore. Please save it to an empty directory. In this tutorial the directory is called NetAScore.
Then, create a new subdirectory named data within the same folder, next to the docker-compose.yml file.
Proceed with downloading the settings file template from GitHub (examples/settings_osm_query.yml), and save it to the data subdirectory.
Lastly, you need to download the mode profiles for bikeability (profile_bike.yml) and walkability (profile_walk.yml) and save them to the data directory as well.
2. Let’s adapt the settings file for the City of Glasgow#
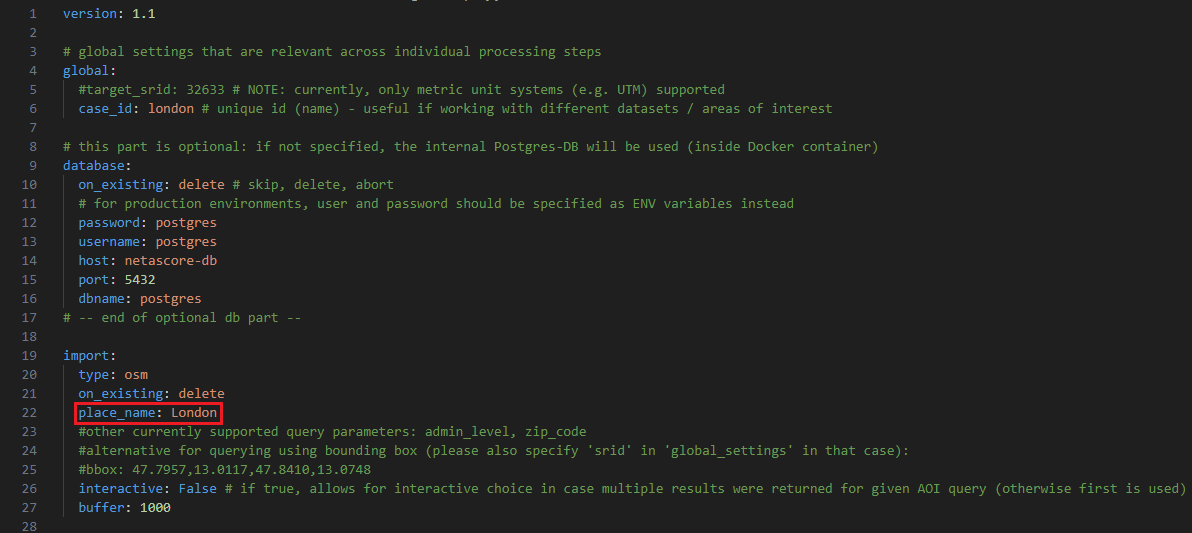
In order to run NetAScore for the City of Glasgow, you need to adapt the settings file (settings_osm_query.yml). To do so, you first change the case_id and then specify the name of the place you want to run NetAScore for.
The case_id is located in the global section of the settings file and is a unique ID used to distinguish between different datasets (only alphanumeric characters are allowed). Choose e.g. case_id: glasgow.
The place_name is used to determine the area for which the OSM data is queried. It can be set in the import-section of the settings file.
For our Glasgow example, change the value of place_name to Glasgow City, which is the name registered in OpenStreetMap.
If you want to know more about the adjustments that can be made within the settings file, feel free to have a look at the wiki page, that deals with further configuration of the settings.
3. Let’s run Netascore!#
Now we are ready to run NetAScore to compute bikeability and walkability for Glasgow.
First, open a terminal window and navigate to the parent folder you created, in our case NetAScore. This should contain the docker-compose.yml file. From here, enter the following command and hit enter:
docker compose run netascore data/settings_osm_query.yml
Docker will now start downloading the NetAScore image and the PostgreSQL database image, setup the environment and execute the workflow for your area of interest. The last argument represents the settings file to use. So if you want to try and compare different settings, feel free to duplicate your settings file and reference it here when calling docker compose.
When running NetAScore for the first time, the process might take a while, as all docker images need to be downloaded. It will be faster the next time.
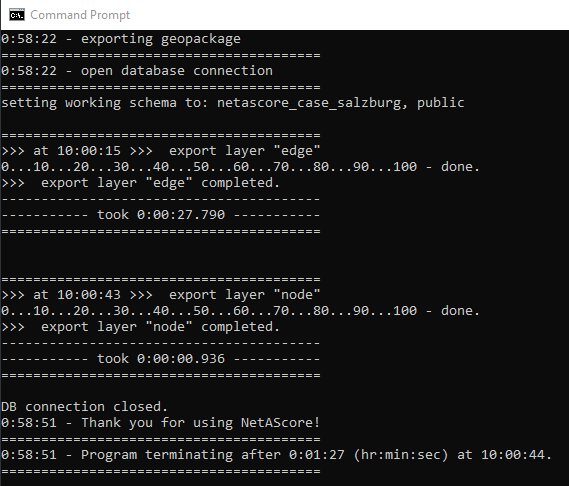
Still, running the docker image might take a couple of minutes, as NetAScore first queries all required OpenStreetMap data using the Overpass API. It afterwards imports, processes and exports the final dataset. You can tell the run was completed successfully once the Database connection is closed, after both “edge” and “node” layers were exported. It should look similar to this:
You can now find the assessed network as a geopackge within the data-sub-folder you previously created. It includes bikeability in columns index_bike_ft and index_bike_tf and walkability in index_walk_ft and index_walk_tf. The extensions ft and tf refer to the direction along an edge: from-to or to-from node. These values represent the assessed suitability of a road segment for cycling (bikeability) and walking (walkability).
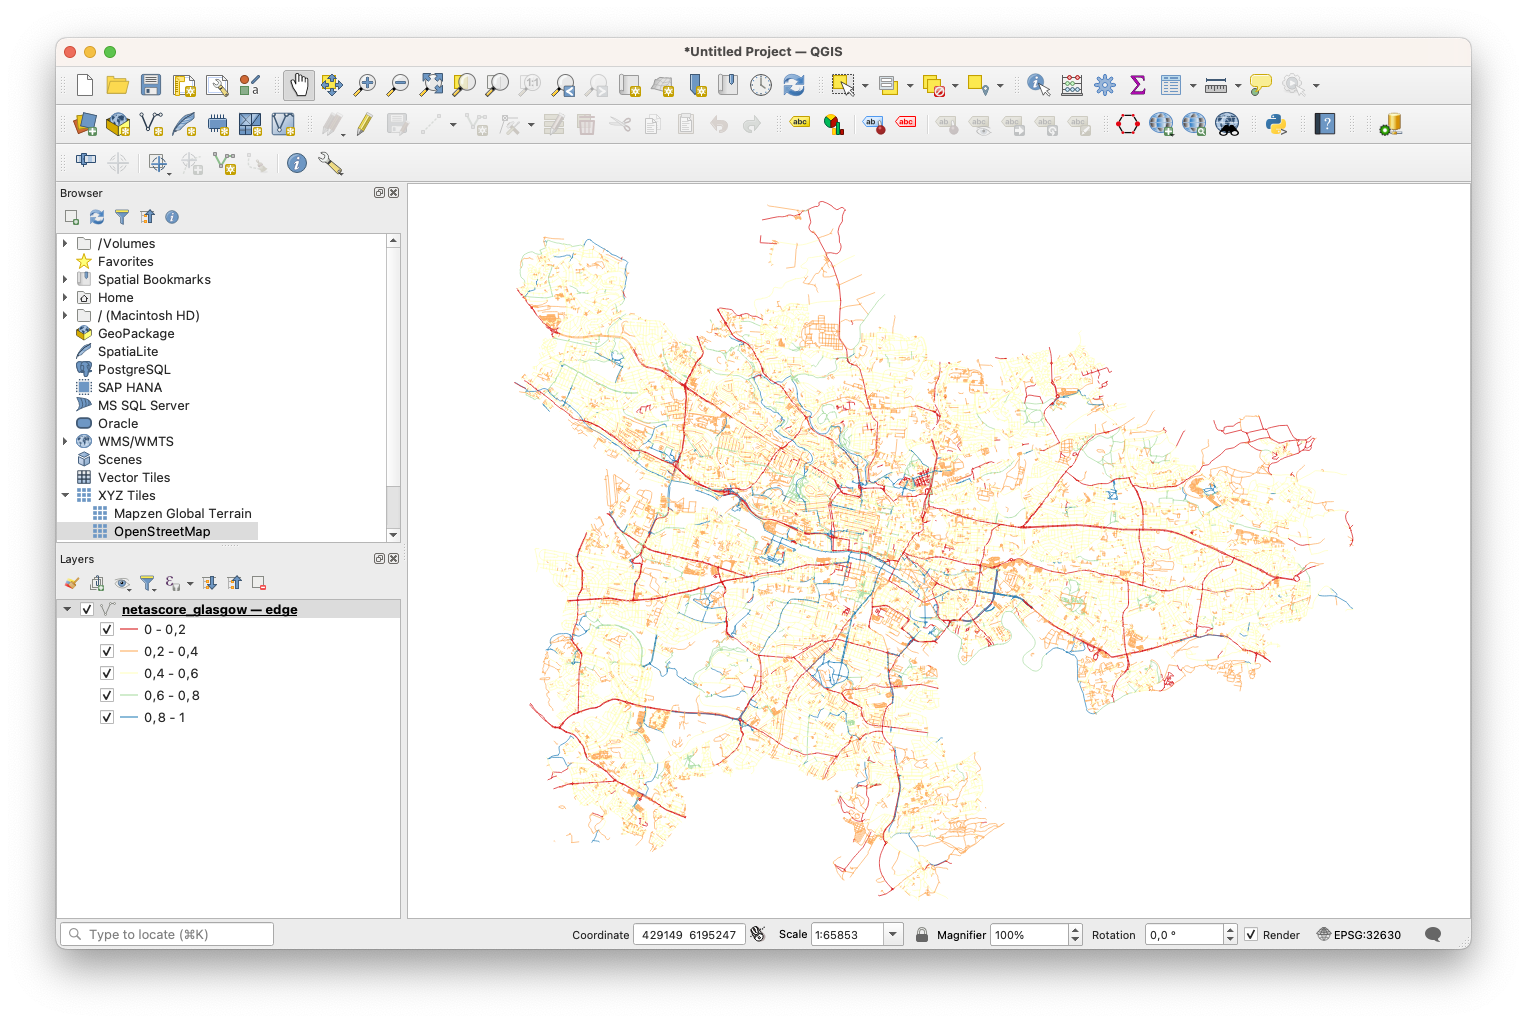
4. Let’s visualise the results!#
If you want to have a look at the results for segment-based bikeability and walkability, just follow the instructions in our QGIS tutorial (part 2).
5. Feel free to customize…#
Now that you succeeded on running NetAScore for Glasgow City, maybe you want to compute bikeability and walkability for a different area of interest? Or are you interested in adjusting the model parameters for bikeability and walkability?
Choosing a different area of interest#
To choose a different area of interest, simply replace the place_name in the settings file accordingly. Also, do not forget to change the case_id, otherwise your previous output file will be overwritten.
You might want to consider adding one of the additional query parameters to the import section:
interactive: True: this setting allows you to choose from a list of features in case that your search term returned more than one matching geometryadmin_level: filters the given results for OSMadmin_levelproperty (see OSM documentation)zip_code: filters the given results for a ZIP code (if available in OSM data)
Using these options, NetAScore directly downloads OpenStreetMap data via Overpass API. This is a convenient feature suitable for city- or regional scale. However, if you are interested in assessing larger spatial extents, please follow the instructions in the next section on how to use local OSM data input.
For further options, please read the detailed information on our Github Wiki page.
Please note: Network data is being queried based on the bounding box (rectangle) containing the polygon returned for the place name query. If you do not specify a reference system (global option target_srid), the UTM zone suitable for the centroid of the area of interest is used.
Using local OSM data as input: ideal for large areas#
You can also provide a local OSM file to NetAScore using the filename property instead of the place_name in settings_osm_query.yml. For our current workshop, you find an example for the City of Glasgow on the shared web drive (glasgow-latest.osm.pbf). OpenStreetMap exports are provided on different scales with global coverage e.g. by Geofabrik.
This is how the import section of the settings file should look like for the Glasgow example:
import:
  type: osm
  on_existing: delete
  filename: glasgow-latest.osm.pbf
If you use an OSM file as input, you currently have to specify the target SRID (spatial reference system) manually. To do so, please add the key target_srid with the respective EPSG code as value to the global section of the settings file. Please note: Only metric reference systems are currently supported and will generate valid results.
For the Glasgow example, the global section could read as follows:
global:
  case_id: glasgow
  target_srid: 32630
Add optional data layers#
If available for your area of interest, you can supply additional input layers to NetAScore for improving model results. The main options for extension are:
DEM (digital elevation model): It is used to determine gradient (slope) of road segments. By default, this input will be considered in both the bikeability and the walkability profile.
noise (polygons of (traffic) noise classes): This input will be used for refining walkability assessment with the default mode profile.
Details on how to adapt the settings file for using these optional inputs are provided in the NetAScore Wiki.
Customise the walkability and bikeability profiles#
As perception of infrastructure suitability for active mobility has strong individual and purpose-specific components, we allow easy access to customising mode profile definitions. You are invited to experiment with the indicator weights as well as with the value mappings per indicator. All of these definitions are contained in the mode profile files. The default profiles are:
profile_bikeprofile_walk
Both default mode profiles should already be located in your data subdirectory of NetAScore by now. You also find them in the examples folder on Github.
It is up to you whether you want to directly adjust the default profile files or work on local copies. In case of working on copies, just reference the newly created profile file from the settings file. In the example below, a new profile named “bike_child” is added, with its definition being stored in profile_bike_child.yml.
profiles:
  -
    profile_name: bike
    filename: profile_bike.yml
    filter_access_bike: True
  -
    profile_name: bike_child
    filename: profile_bike_child.yml
    filter_access_bike: True
  -
    profile_name: walk
    filename: profile_walk.yml
    filter_access_walk: True
Details regarding how to reference mode profiles from the settings file are provided in the Wiki.